
AI-powered website creation is evolving incredibly fast.
Today, tools like Claude AI can generate surprisingly professional website layouts from a single prompt, while tools like ClonewebX make it possible to transfer those AI-generated designs directly into Elementor or Webflow.
This creates a completely new workflow for freelancers, agencies, no-code creators, and web designers.
Instead of manually rebuilding layouts section by section, you can now move from:
AI Idea → Website Generation → Editable Production Website
In this tutorial, we’ll walk through the complete workflow step by step.
Why AI website generation is becoming so popular
Traditional web design workflows are often slow and repetitive.
A typical process usually involves:
- Finding inspiration
- Creating wireframes
- Designing in Figma
- Rebuilding layouts in Elementor or Webflow
- Adjusting responsiveness manually
With AI tools like Claude AI, much of this process can now be accelerated dramatically.
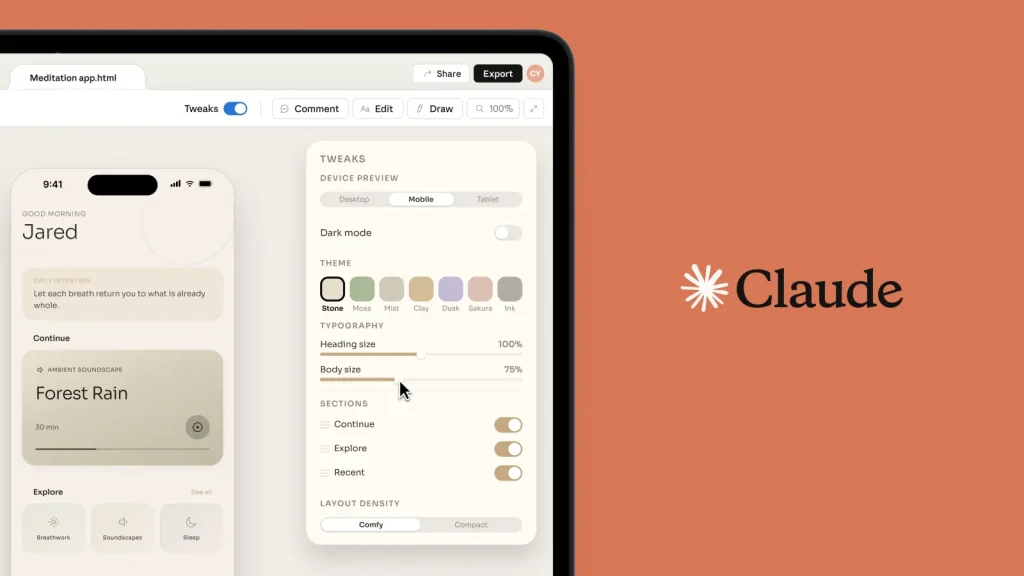
Claude Design can generate:
- Landing pages
- Multi-section business websites
- SaaS layouts
- Portfolio websites
- Agency websites
Application interfaces And most importantly, the results already look surprisingly polished. When combined with ClonewebX, these AI-generated websites can be transferred into editable page builders instead of remaining static previews.
Step 1 — Create a Detailed Prompt
The quality of your result depends heavily on the quality of your prompt.
For this example, we created a detailed prompt for an Interior Designer website.
The prompt included:
- Header
- Hero
- Section
- About Us
- Services
- Team Section
- Testimonials
- Blog Section
- Footer
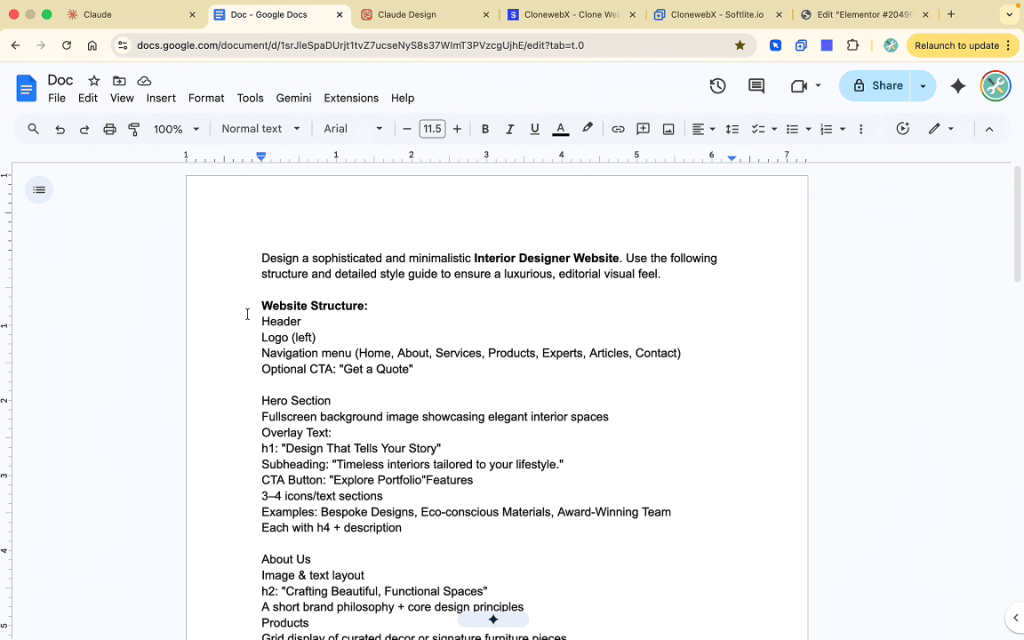
However, structure alone is not enough.
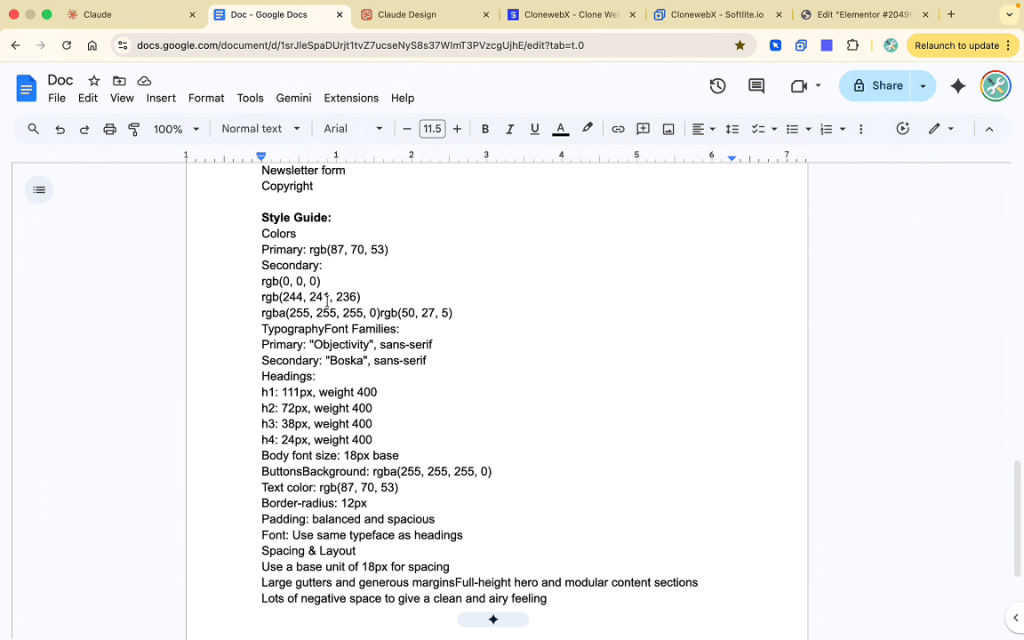
You should also include a detailed style guide inside the prompt:
- Typography
- Colors
- Spacing
- Design mood
- Visual hierarchy
- Border radius
- Layout behavior
- Animation preferences
The more specific your instructions are, the better the generated website will look.
A well-structured prompt can dramatically improve:
- Layout consistency
- UI quality
- Responsive behavior
- Design accuracy
Step 2 — Generate the Website with Claude AI
After preparing the prompt, go to Claude.ai/design
Inside Claude’s Design section, you can generate websites and applications directly from prompts.
Claude Design is currently considered one of the strongest AI models for frontend generation and coding tasks. It is a top-notch AI website builder.
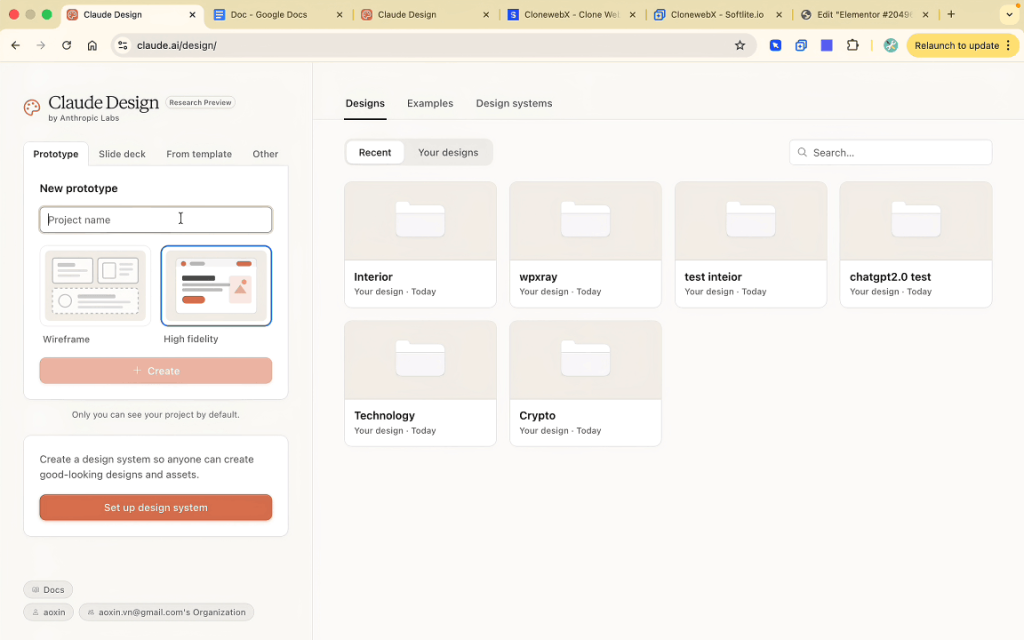
After inserting the prompt, Claude Design automatically generates:
- Complete website sections
- Responsive layouts
- Modern typography
- UI components
- Structured visual hierarchy
One of the most impressive parts is how professional the layouts already feel.
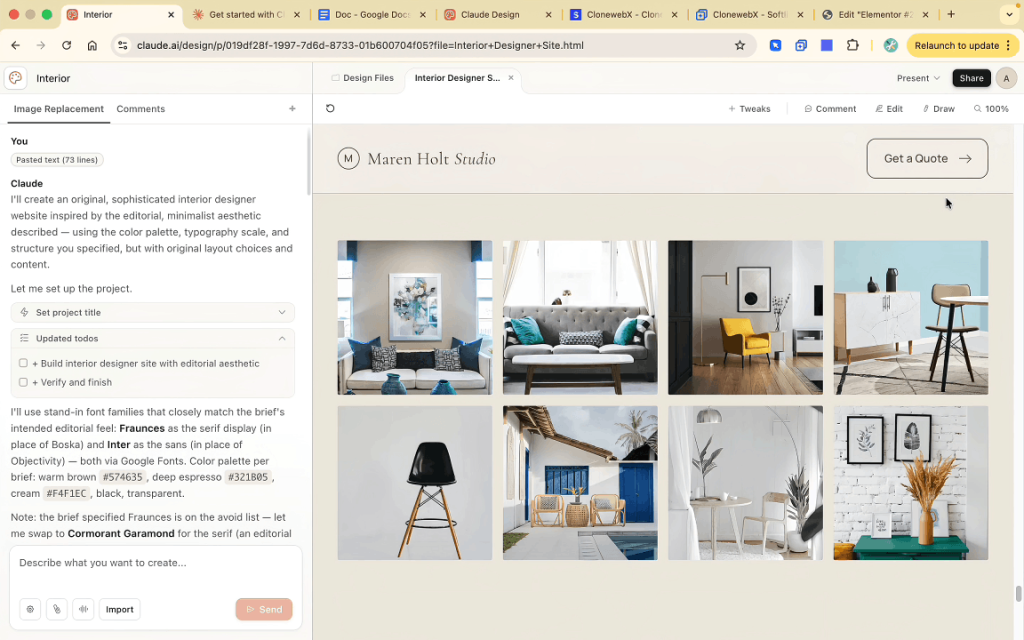
As you scroll through the generated website, sections typically include:
- Premium hero designs
- Balanced spacing
- Responsive cards
- Modern grids
- Clean typography systems
- Organized content hierarchy
After inserting the prompt, Claude Design automatically generates:
- Complete website sections
- Responsive layouts
- Modern typography
- UI components
- Structured visual hierarchy
One of the most impressive parts is how professional the layouts already feel.
Claude Design also allows conversational editing.
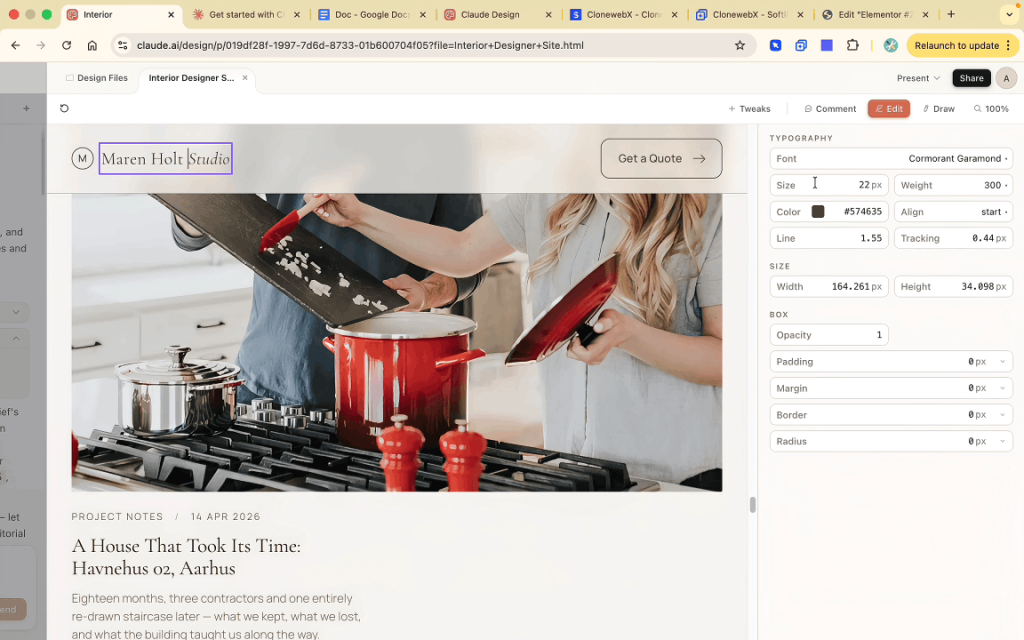
You can ask it to:
- Change colors
- Improve spacing
- Redesign sections
- Adjust layouts
- Add animations
- Refine typography
This makes iteration much faster than traditional design workflows.
Step 3 — Open the Live Preview
To preview the generated website properly:
- Click “Present”
- Choose “New Tab”
This opens the website in full-screen live preview mode.
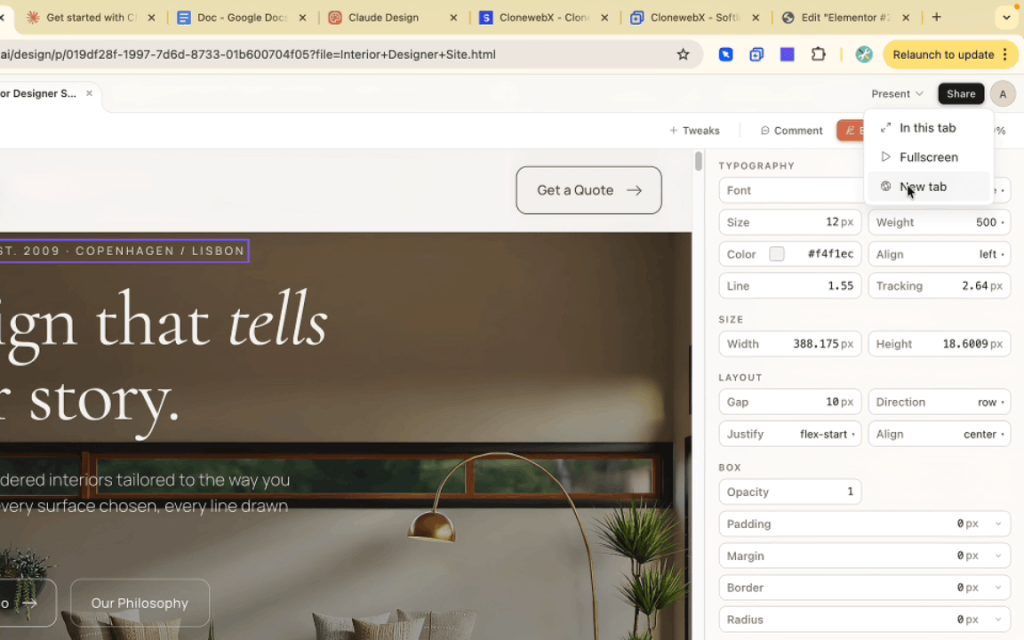
At this stage, the website already behaves similarly to a real production site.
Before exporting, make sure to scroll to the bottom of the page first.
This ensures all lazy-loaded elements, animations, and dynamic sections are fully loaded before using ClonewebX.
This small step can significantly improve export accuracy.
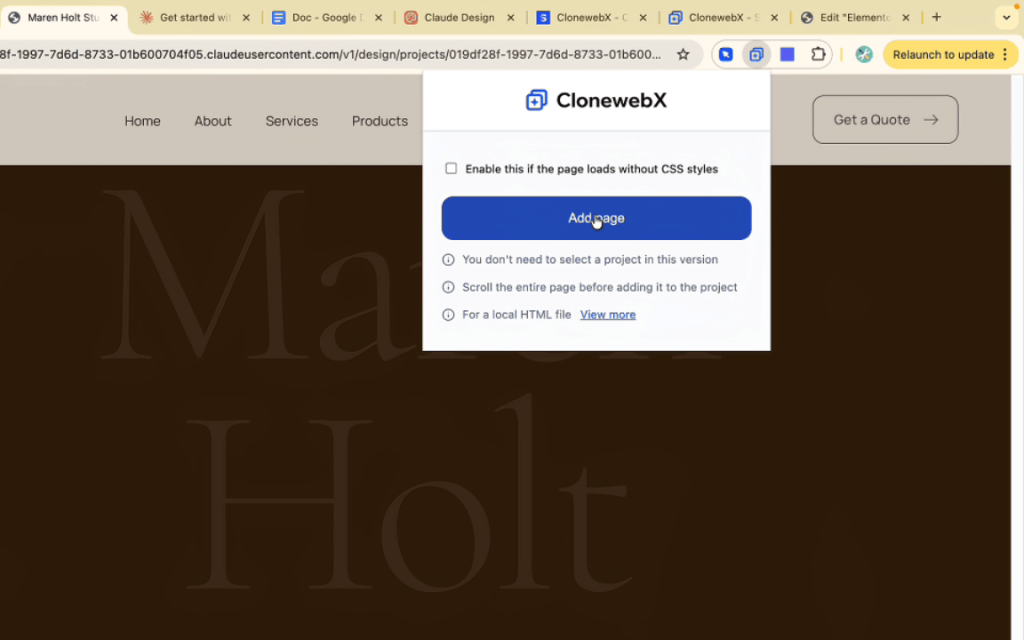
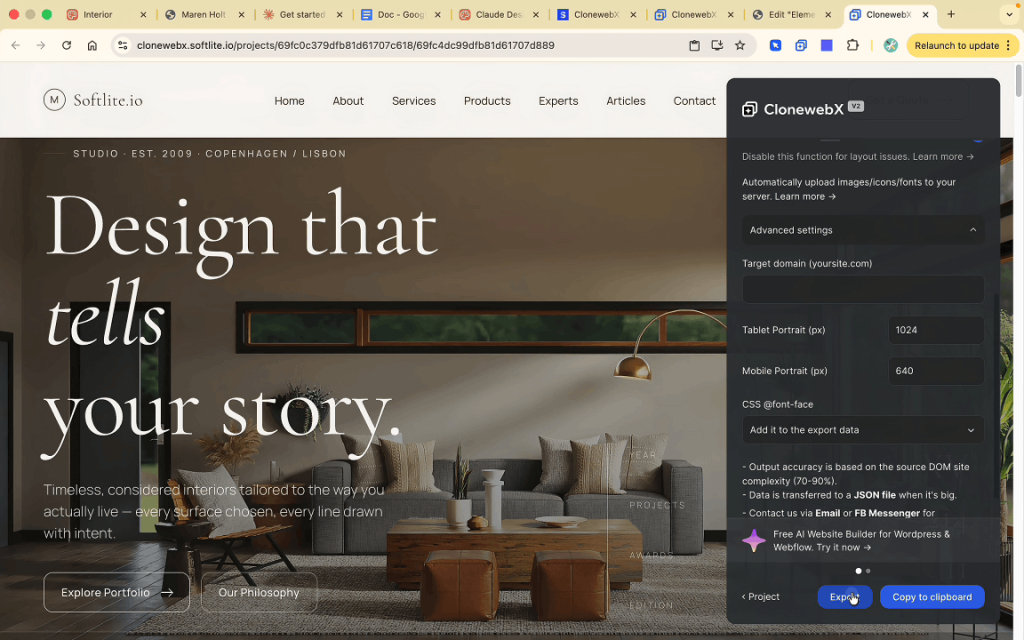
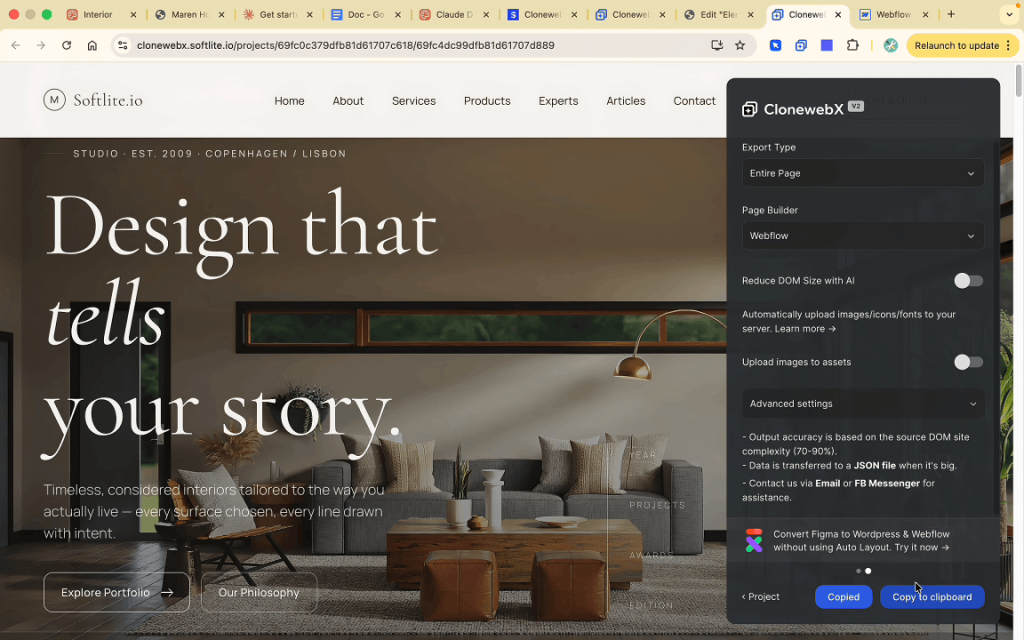
Step 4 — Export the Website using ClonewebX
Now we move into the production workflow.
Open the ClonewebX extension and click “Add Page”.
You’ll be redirected to the simulation environment.
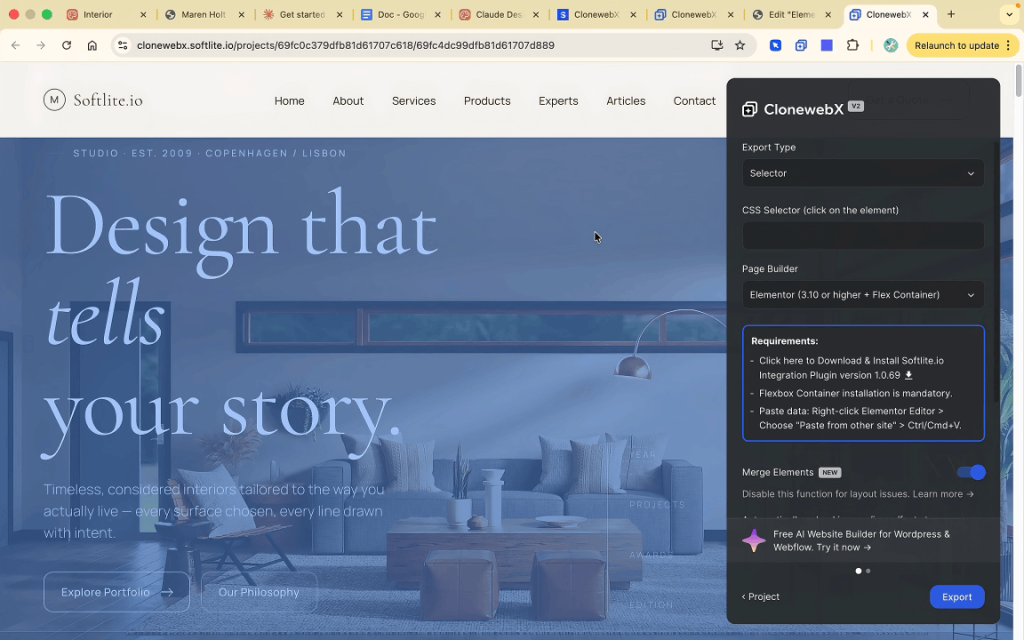
Inside ClonewebX, you can:
- Select specific sections
- Export entire pages
- Choose your page builder
- Configure responsive settings
- Optimize output structure
Supported outputs include:
- Elementor
- Webflow
- Bricks
- Gutenberg
- Divi
- Breakdance
For this demo, we selected Elementor.
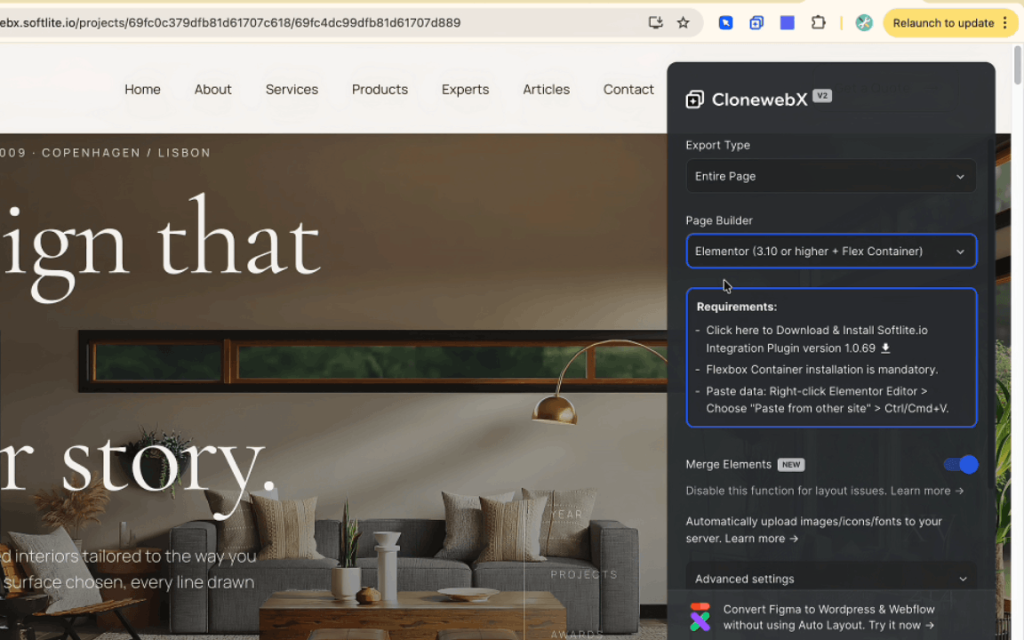
Important Elementor Settings
Before exporting into Elementor:
- Install the Softlite plugin
- Enable Elementor Flexbox mode
- Enable Merge Elements for cleaner structure
ClonewebX typically achieves around 70–90% visual similarity compared to the original website. The result is static but fully editable.
Once the export finishes, the generated data is copied directly into your clipboard.
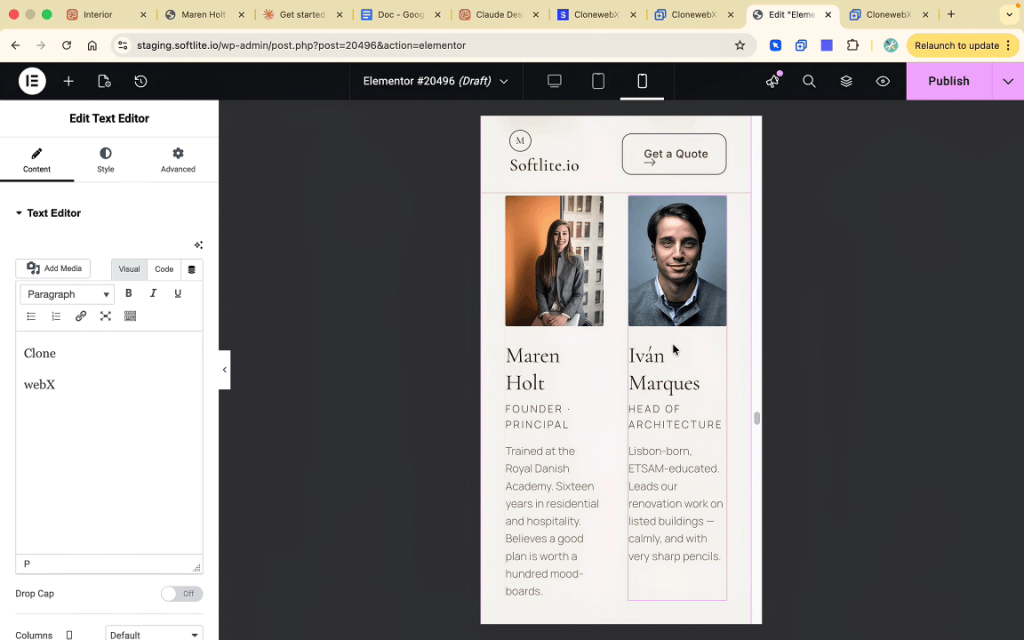
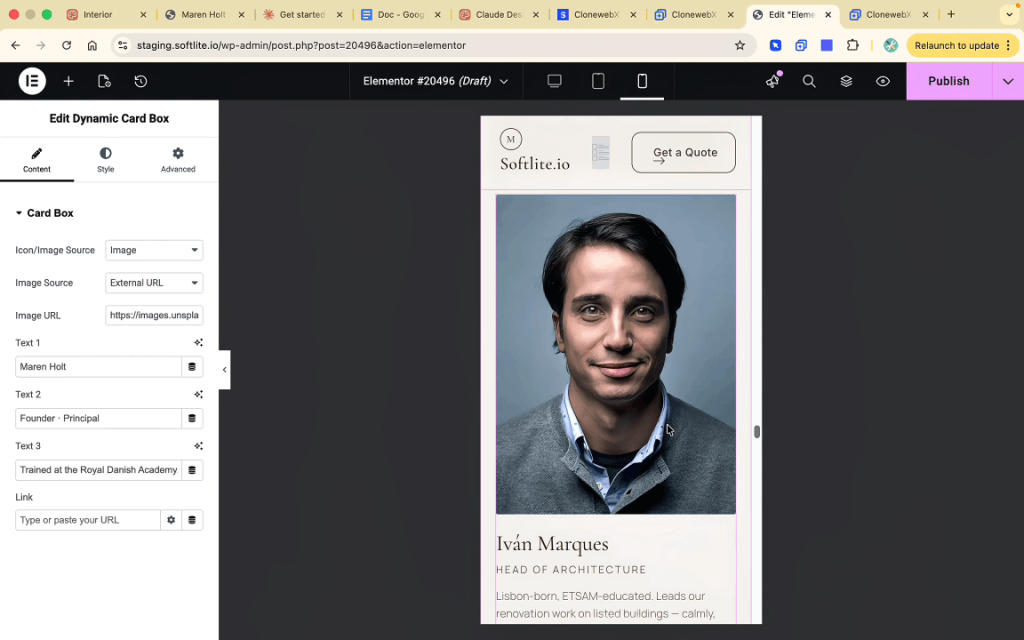
Step 5 — Import Into Elementor
Inside Elementor:
- Right-click on the canvas
- Choose “Paste from Other Site”
- Press Control + V or Command + V
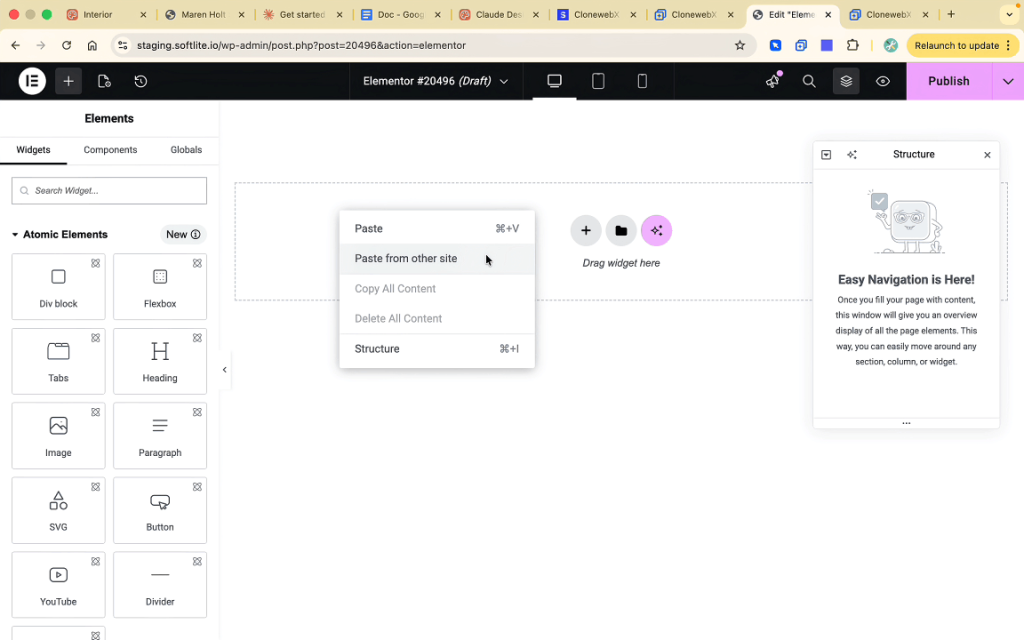
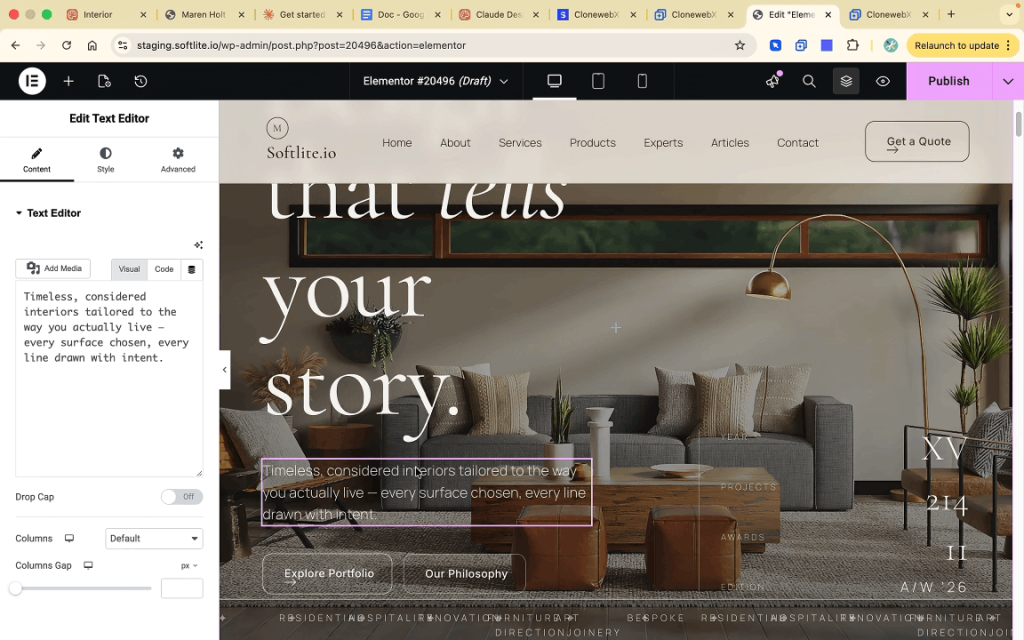
This is where the workflow becomes extremely powerful.
Instead of rebuilding layouts manually, you now have:
- Editable containers
- Responsive sections
- Structured layouts
- Reusable design blocks
From here, you can:
- Replace content
- Change images
- Add animations
- Modify spacing
- Customize typography
- Insert additional sections
For freelancers and agencies, this can save an enormous amount of production time.
Step 6 — Fix Responsive Breakpoints
Responsive optimization is one of the most important parts of the workflow.
After importing into Elementor, some sections may still display incorrectly on mobile.
For example:
- Two-column layouts may remain active on small screens
- Spacing may not match the original version
- Mobile stacking behavior may differ
To fix this:
- Go back to the original Claude AI live preview
- Open browser inspect mode
- Resize into mobile dimensions
- Identify the original breakpoint
In our example, Claude Design used a 640px mobile breakpoint.
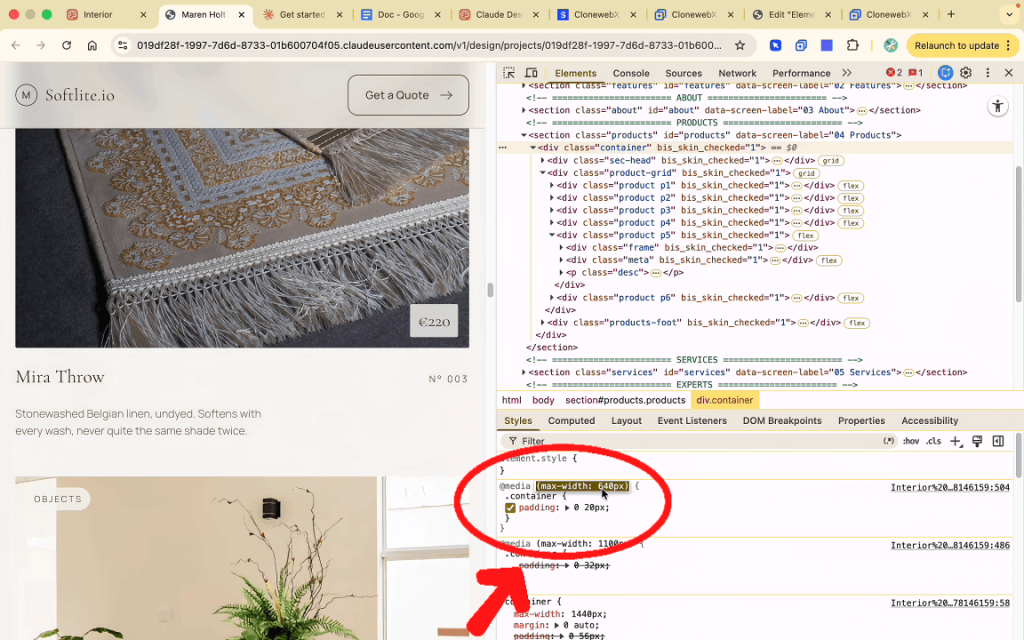
After discovering this value:
- Return to ClonewebX
- Open Advanced Settings
- Change Mobile Portrait breakpoint to 640
- Export again
After re-importing the updated version, the layout correctly stacked into single-column mobile sections.
This dramatically improved responsive accuracy.
Step 7 — Export Into Webflow
Inside ClonewebX:
- Select Webflow
- Click Export
- Press “Copy to Clipboard”
Then inside Webflow:
- Open the editor
- Press “Control + V” or “Command + V”
The website instantly appears as editable Webflow elements.
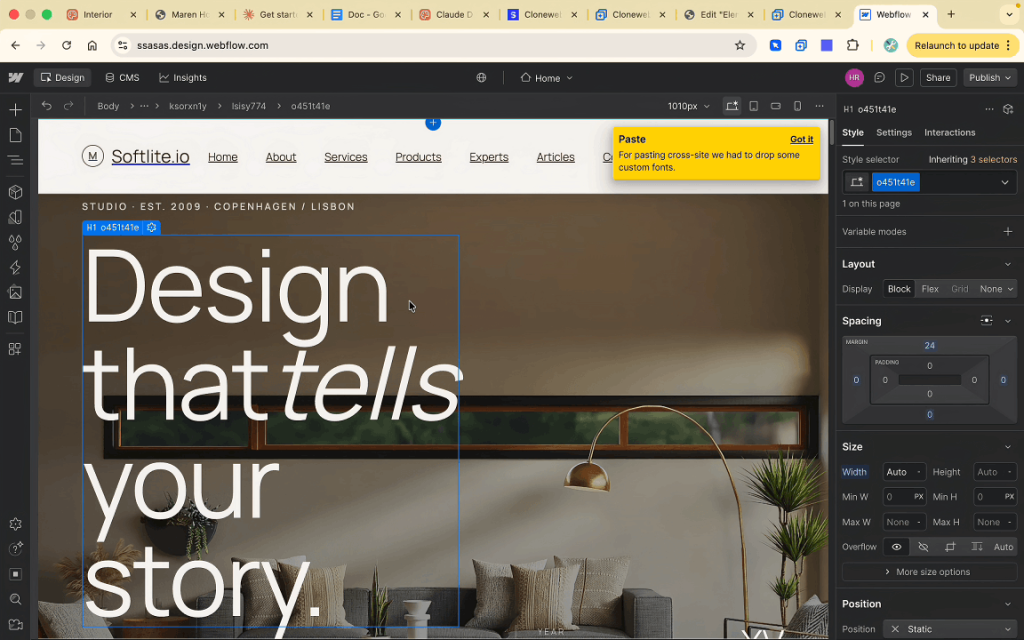
You can then:
- Modify layouts
- Customize typography
- Adjust containers
- Edit sections
- Improve responsiveness
For Webflow creators, this workflow can dramatically reduce production time while maintaining design flexibility.
Benefits of this AI Claude design workflow
This workflow provides several major advantages:
Faster Production
Reduce manual rebuilding time dramatically.
Better Iteration Speed
AI-generated concepts can be refined much faster.
Editable Results
The exported layouts remain customizable.
Multi-Platform Flexibility
Export into Elementor, Webflow, Bricks, and more.
Better Client Workflow
Rapid prototyping becomes significantly easier.
Is AI website builder replacing Web designers?
Not entirely.
AI is currently best used as a productivity accelerator rather than a full replacement for designers or developers.
The strongest workflow today is:
Human Creativity + AI Assistance
AI handles:
- Initial structure
- Layout generation
- Speed Rapid iteration
Humans still handle:
- Branding
- UX decisions
- Strategy
- Refinement
- Client communication
- Optimization
The combination is what makes this workflow so powerful.
Final Thoughts
AI-assisted web design is evolving faster than ever.
Tools like Claude Design can already generate impressive frontend layouts, while ClonewebX bridges the gap between AI concepts and real production websites.
For freelancers, agencies, and no-code creators, this creates an entirely new way to build websites:
- Faster
- Smarter
- More scalable
- More efficient
And honestly, we are probably still in the early stages of what AI Website Generator will become over the next few years.
If you want to accelerate your web design workflow in 2026, combining Claude AI with ClonewebX is definitely worth exploring.
Frequently questions & answers
1. Can Claude AI generate full websites from a single prompt?
Yes. Claude AI can generate complete website layouts including hero sections, service sections, testimonials, blog layouts, footers, and responsive structures from a well-written prompt.
2. Is the exported website fully editable in Elementor?
Yes. After exporting with ClonewebX, the layout becomes editable inside Elementor. You can modify text, images, spacing, typography, containers, and additional elements.
3. Does ClonewebX support Webflow exports?
Yes. ClonewebX supports exporting websites into Webflow as editable elements instead of static screenshots.
4. How accurate is the exported result compared to the original AI website builder?
In most cases, the export quality reaches around 70–90% similarity depending on the complexity of the source website, and responsive behaviors.
5. Why do responsive issues sometimes appear after exporting?
Different tools may use different responsive breakpoints. For example, Claude Design may use a different mobile breakpoint than Elementor’s default settings, which can affect mobile layouts after importing.
6. How can I improve mobile responsiveness after export?
You can inspect the original AI-generated website to identify the correct breakpoint values, then apply those settings inside ClonewebX before exporting again.
7. Does ClonewebX support Bricks Builder?
Yes. ClonewebX supports multiple page builders including Elementor, Bricks, Gutenberg, Divi 5, Breakdance, and Webflow.