
Introduction
In this guide, you’ll learn the complete workflow how to build websites with UIbrainX—from finding design inspiration to exporting a production-ready website for Elementor, Gutenberg, Bricks, Breakdance, Divi 5, or Webflow.
How to Build Websites with UIBrainX
What You'll Learn
By following this tutorial, you’ll learn how to:
- Find website inspiration from existing designs.
- Convert a reference design into a detailed AI prompt.
- Generate a complete website using UIBrainX.
- Refine layouts and improve sections with AI.
- Add entirely new sections without manual design work.
- Export the finished project into your preferred website builder.
- Continue editing the exported website with full flexibility.
Now that you understand the overall workflow, the next step is to find a design reference and use AI to convert it into a detailed prompt for UIBrainX.
In the following chapter, we’ll start by exploring how to discover website inspiration and transform it into a high-quality AI prompt that generates professional website layouts.
Chapter 2 - Finding Website Design Inspiration
Finding the right design inspiration is the foundation of creating a great AI-generated website. Instead of starting with a blank canvas, you can use existing landing pages as visual references and let AI transform them into structured design prompts that UIBrainX can understand.
This workflow helps you recreate the style and structure of professional websites without manually describing every design detail yourself.
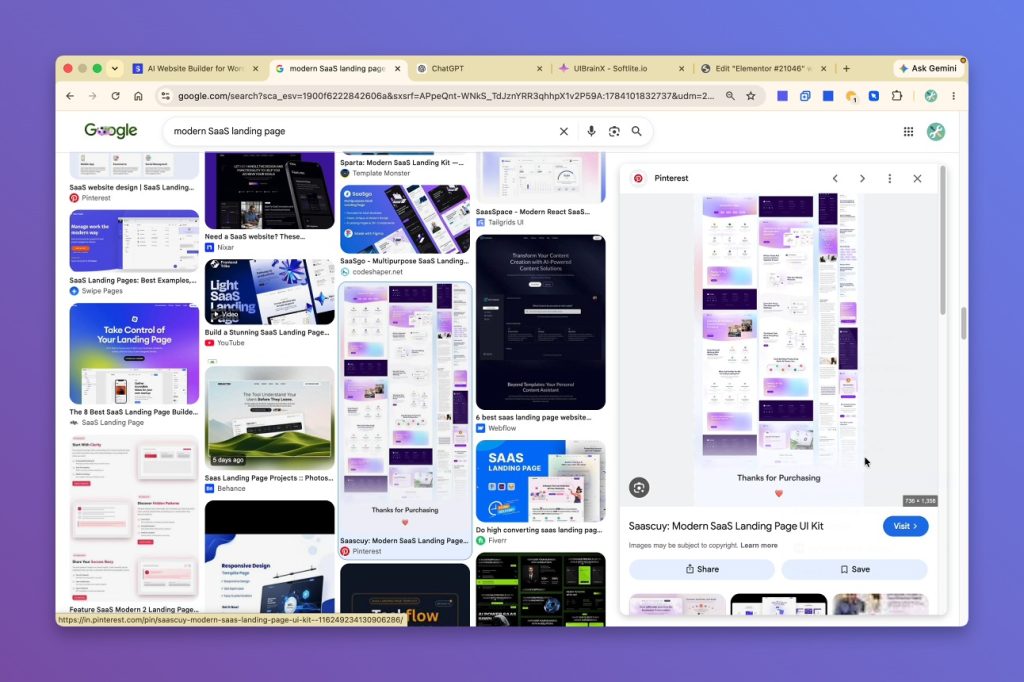
Step 1: Search for Website Inspiration
Begin by searching Google for the type of website you want to build.
For example:
Modern SaaS Landing Page
To discover more visual references, switch to the Images tab. You’ll find hundreds—or even thousands—of landing page designs collected from websites, design galleries, and creative communities.
At this stage, the goal isn’t to find the “perfect” design. Simply choose a layout that matches the overall style you’re aiming for.
Tip: Don’t spend too much time comparing designs. Since you’ll be refining the final result with AI later, almost any high-quality reference can serve as a great starting point.
Step 2: Let AI Analyze the Design
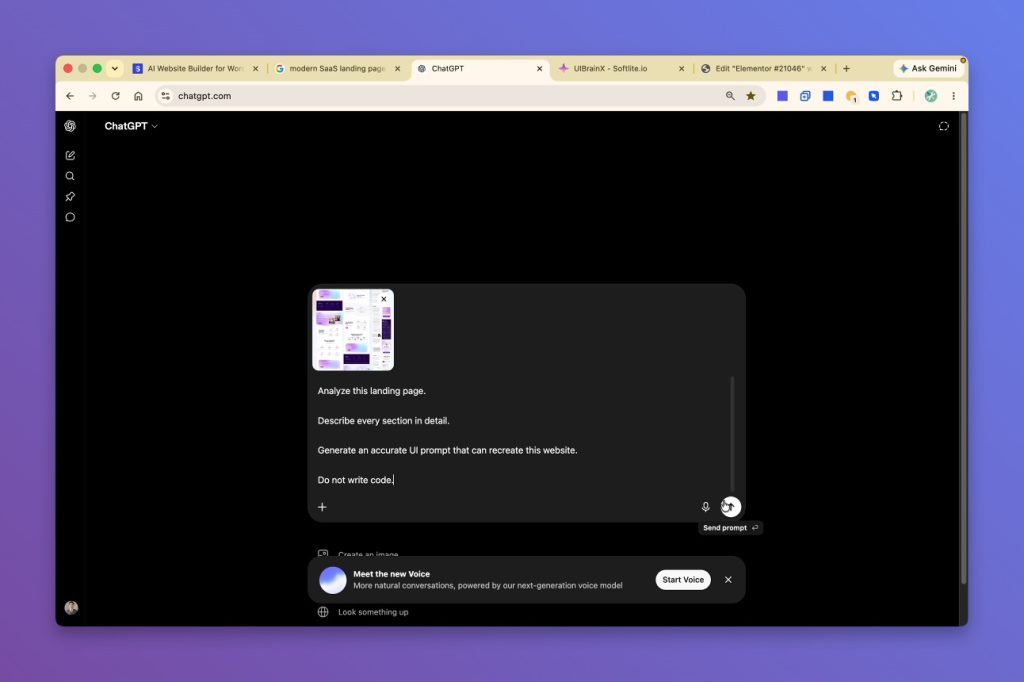
Once you’ve selected a design, copy the image and send it to an AI model that supports image understanding.
Popular options include:
- ChatGPT
- Claude
- Gemini
- DeepSeek
- Etc
The specific AI model isn’t important. What matters is its ability to analyze a website screenshot and describe it in detail.
Step 3: Convert the Screenshot into a UI Prompt
Instead of asking the AI to generate HTML or code, ask it to produce a comprehensive UI design prompt.
A good prompt should instruct the AI to:
- Analyze the entire landing page.
- Describe every section individually.
- Explain the layout and visual hierarchy.
- Identify typography styles.
- Describe spacing and alignment.
- Extract the color palette.
- Explain buttons, cards, icons, and UI components.
- Preserve the overall design style.
- Generate a prompt suitable for AI website builder generation.
The resulting prompt becomes the design specification that UIBrainX will use to recreate the website.
Best Practice: Explicitly tell the AI not to generate any code. The objective is to create a detailed design prompt, not HTML, CSS, or JavaScript.
Step 4: Review the Generated Design Prompt
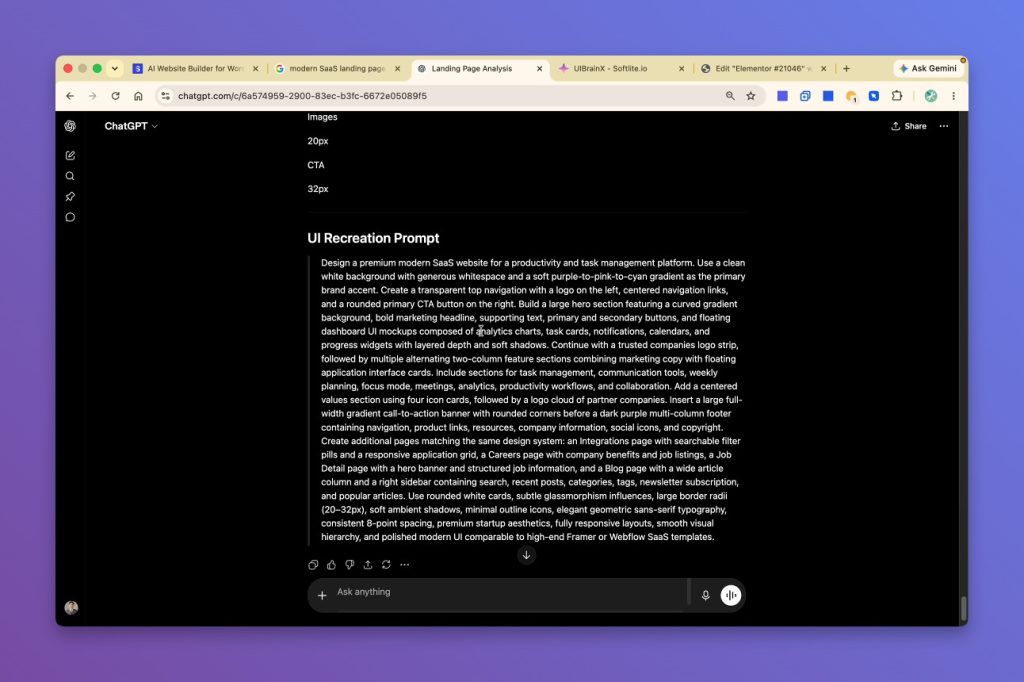
After processing the image, the AI website design returns a detailed description of the website.
A high-quality prompt typically includes:
- Overall page structure
- Visual hierarchy
- Typography Spacing and layout
- Color palette UI components
- Individual section descriptions
- Design style and aesthetics
This structured prompt serves as the blueprint for generating your website inside UIBrainX.
The more complete and descriptive the prompt is, the better UIBrainX can reproduce the overall look and feel of the original design while keeping everything editable.
What's Next?
With your design prompt ready, you’re now prepared to generate your website using UIBrainX.
In the next chapter, you’ll learn how to import the AI-generated prompt into UIBrainX, generate a complete website, and begin refining the layout using built-in AI website design tools.
Chapter 3 — Generate Your Website with UIBrainX
With your AI-generated design prompt ready, it’s time to bring your website to life using UIBrainX.
In this step, you’ll create a new project, generate a complete website from your prompt, review the generated layout, and preview its responsive design before moving on to AI-powered refinements.
Step 1: Create a New Project
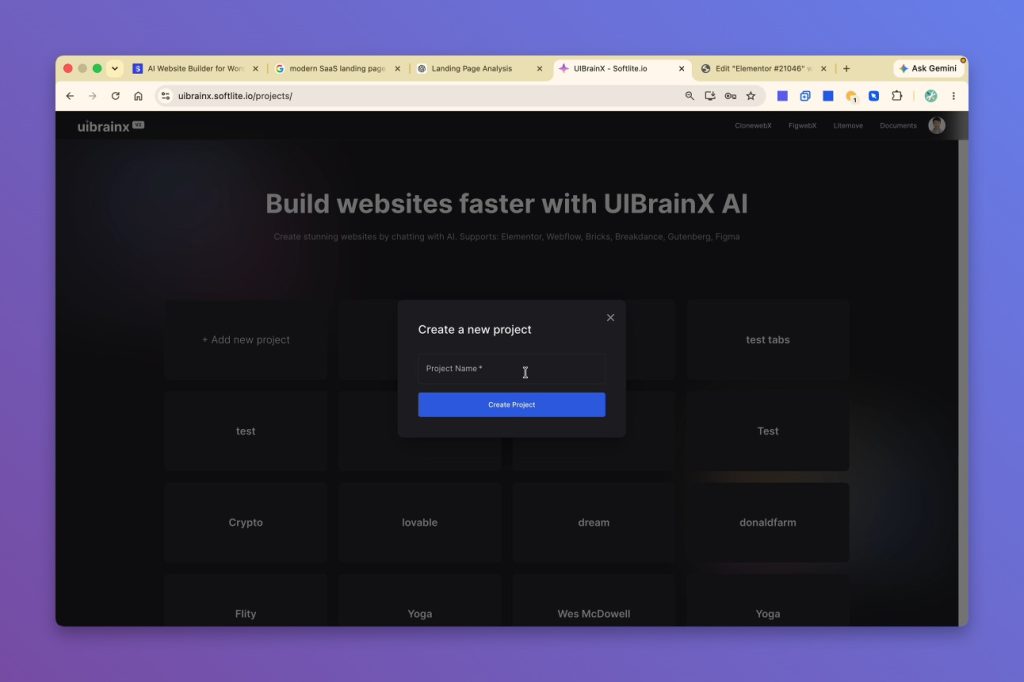
Start by opening UIBrainX and creating a new project.
Click Create New Project, enter a project name, and open the editor.
Once inside the workspace, you’ll have two ways to begin your project:
- Start with one of UIBrainX’s pre-built design templates.
- Create a completely blank project.
For this tutorial, we’ll start from a blank project to generate the website entirely from the AI prompt.
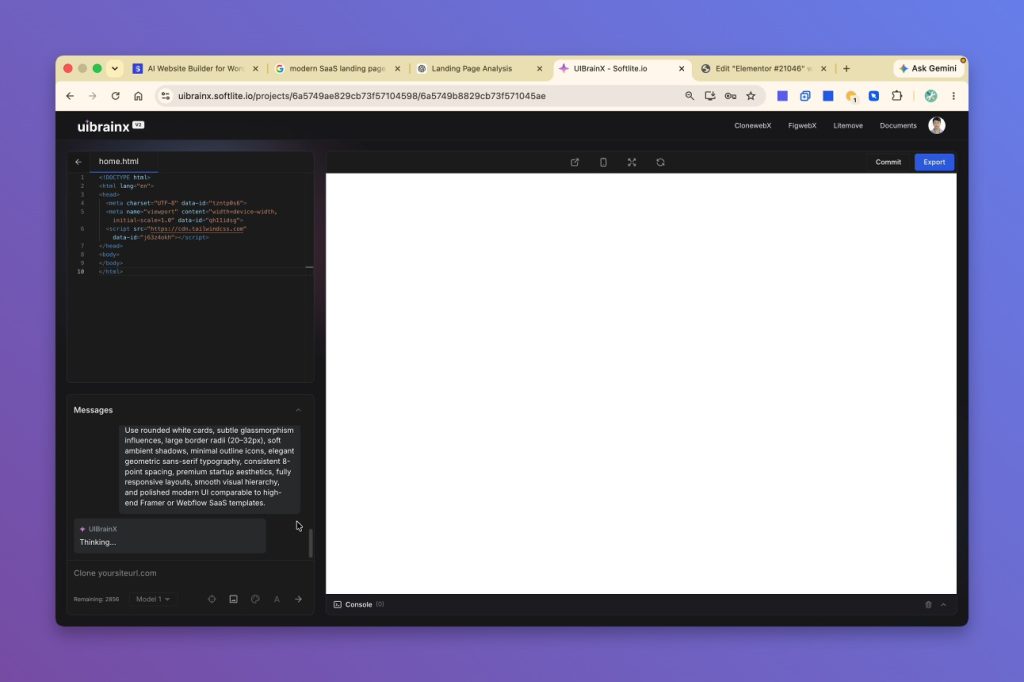
Step 2: Generate the Website with AI
Copy the design prompt generated in the previous chapter and paste it into UIBrainX.
Before submitting the prompt, take a moment to review it and ensure it accurately describes the website you want to create.
When everything looks correct, submit the prompt and let UIBrainX generate the website automatically.
Generation time depends on the complexity of the request, but most projects are completed within a few minutes.
Step 3: Review the Generated Website
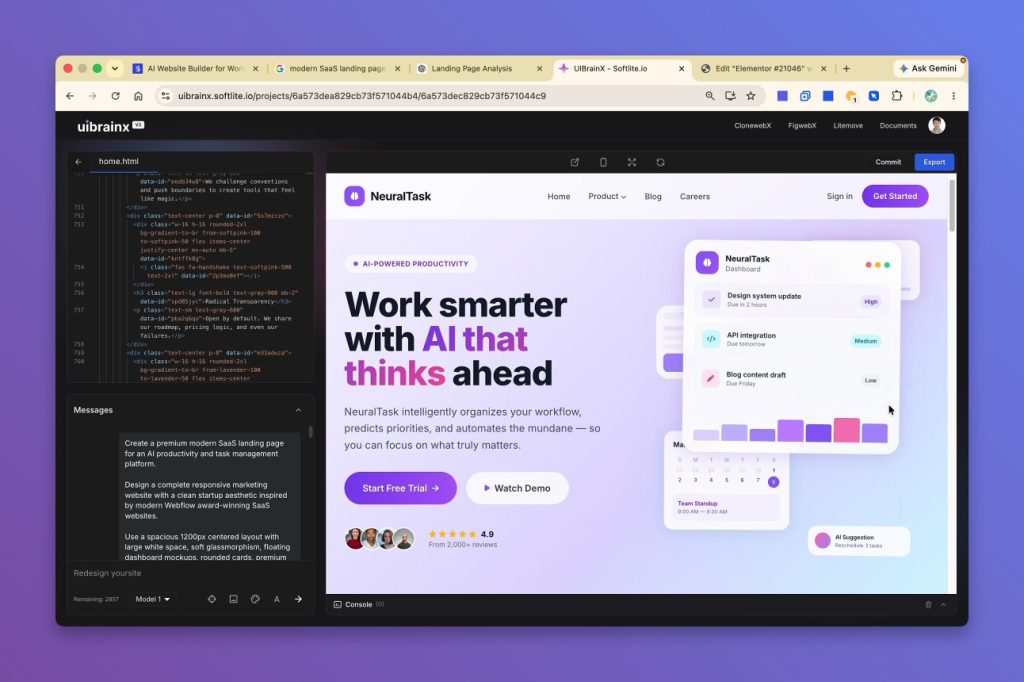
Once the generation process is complete, UIBrainX produces a fully structured website based entirely on the design prompt.
In this example, the AI generates a complete SaaS landing page that closely follows the original design inspiration while creating a unique, fully editable project.
The generated website includes consistent:
- Layout structure
- Visual hierarchy
- Typography
- Color palette
- Spacing UI components
Rather than producing a static mockup, UIBrainX creates a website that is ready for further editing and export.
Automatically Generated Website Sections
As you scroll through the page, you’ll notice that every major section has been created automatically.
Typical sections include:
- Navigation
- Hero section
- Feature sections
- Call-to-action blocks
- Content sections
- Overall page layout
Each section remains fully editable, allowing you to customize text, images, layouts, and styling at any point in your workflow.
This flexibility makes it easy to adapt the generated website to your brand or client requirements without starting over.
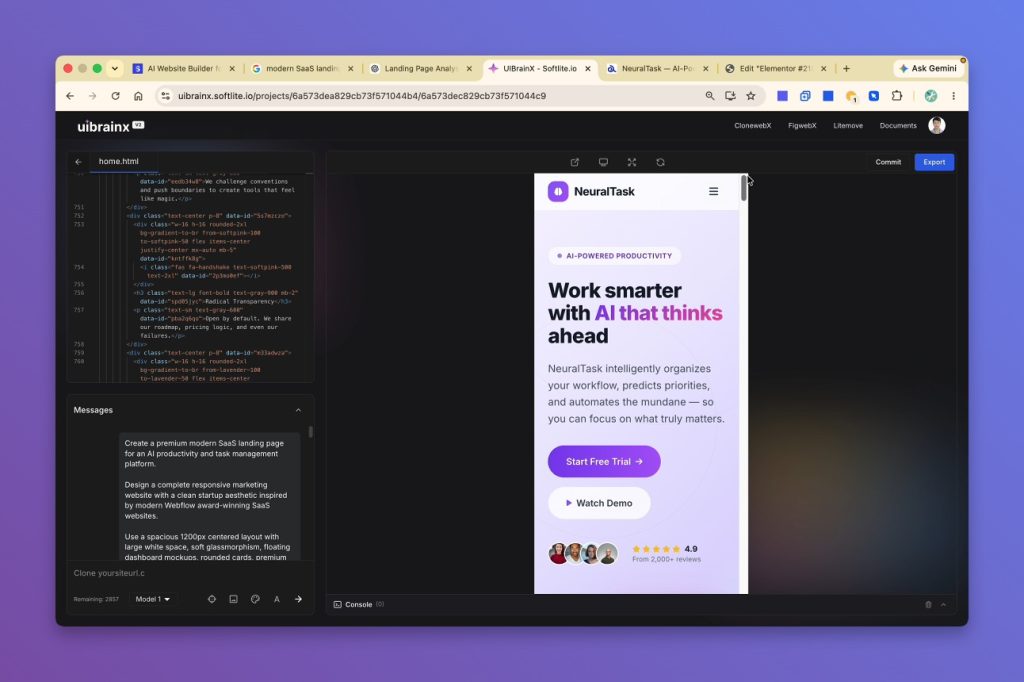
Step 4: Preview the Responsive Layout
Before exporting the project, it’s a good idea to review the responsive version.
Switch to the mobile preview inside UIBrainX to see how the layout adapts to smaller screen sizes.
The generated website automatically adjusts its structure for mobile devices, helping maintain:
- Clean layouts
- Readable typography
- Consistent spacing
- Well-organized content
In many cases, this significantly reduces the amount of manual responsive editing required compared to building the same website from scratch.
Fully Editable from the Start
One of the biggest advantages of UIBrainX is that the generated website isn’t locked into a static design.
Every part of the project remains editable, allowing you to:
- Modify layouts
- Replace content
- Adjust styling
- Rearrange sections
- Continue refining the design
This gives you complete creative control while dramatically reducing the time needed to produce professional websites.
Ready for Export
At this stage, your website is already ready for export.
UIBrainX supports exporting fully editable projects to multiple platforms.
However, before exporting, you can further improve the generated website using UIBrainX’s built-in AI editing capabilities.
These tools make it possible to refine existing layouts, improve content, and expand the website without leaving the editor.
Chapter 4 — Refine and Expand Your Website with UIBrainX AI
One of UIBrainX’s biggest advantages is that website generation doesn’t stop after the first prompt. Once your initial layout is complete, you can continue refining and expanding your website using AI website builder—without rebuilding sections manually.
Whether you want to adjust styling, update content, or generate entirely new interactive components, UIBrainX allows you to do everything directly inside the editor.
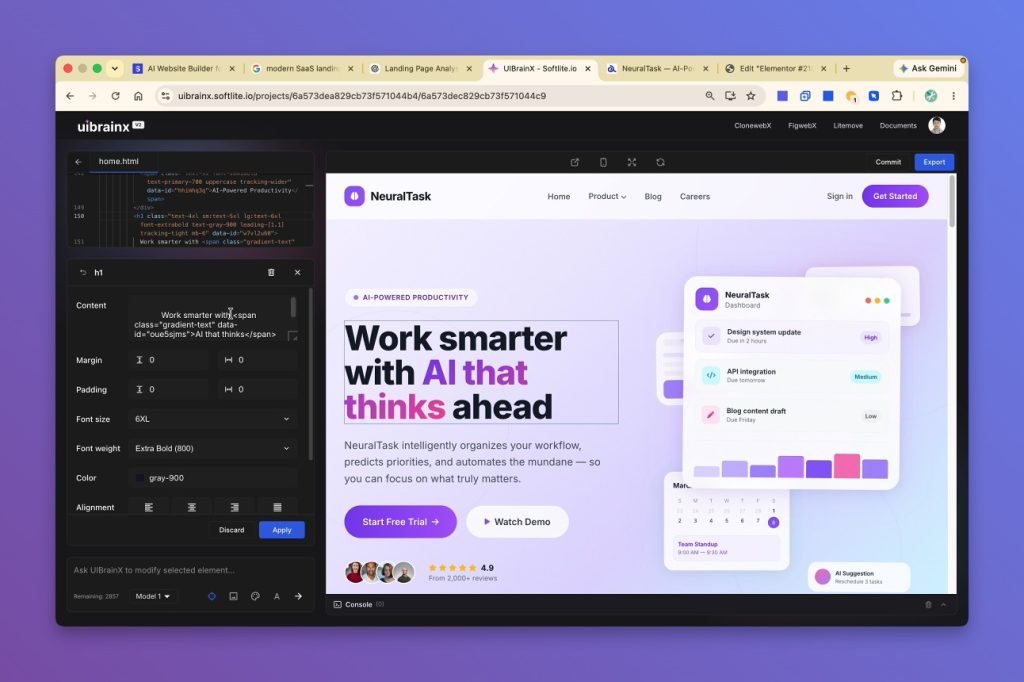
Edit Any Element Visually
Every element generated by UIBrainX is fully editable.
Simply select any component on the page to open the editing panel.
From there, you can customize a wide range of design properties, including:
- Content
- Typography
- Colors
- Spacing
- Alignment
- Layout settings
- Additional styling options
The visual editor gives you complete control over every element without requiring HTML, CSS, or JavaScript.
This makes it easy to fine-tune your design while maintaining a fast, no-code workflow.
Generate New Sections with AI website builder
Instead of manually designing every new section, UIBrainX allows you to create additional content using natural language.
Simply describe what you want, and the AI generates a new section that matches the existing website.
Because the generated content follows the current design system, newly created sections blend seamlessly with the rest of the page.
This dramatically reduces the time required to expand a website after the initial generation.
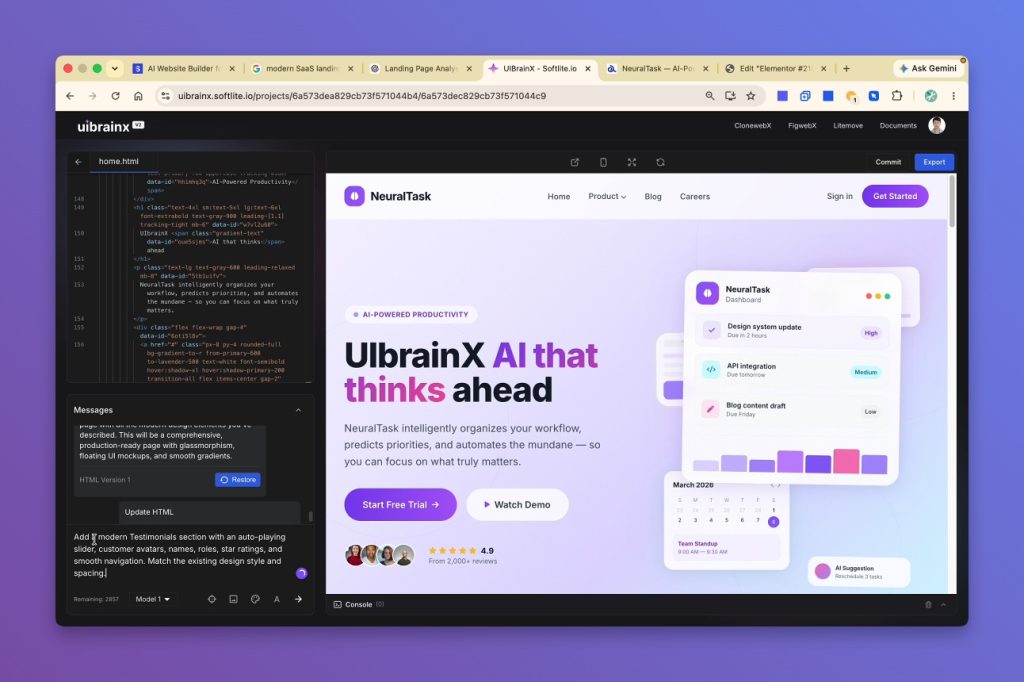
Example 1: Add a Testimonial Slider
To demonstrate AI-powered editing, let’s generate a Testimonials section. Describe the desired section in plain English, including both the layout and functionality.
For example, request:
- A modern testimonial section
- Auto-playing testimonial slider
- Matching typography
- Consistent spacing
- Same visual style as the existing page
Within a few moments, UIBrainX generates a complete testimonial section.
The new content naturally matches the rest of the landing page, preserving the same:
- Typography
- Color palette
- Spacing
- Visual hierarchy
More importantly, the testimonial cards are displayed inside a fully functional slider rather than a static layout.
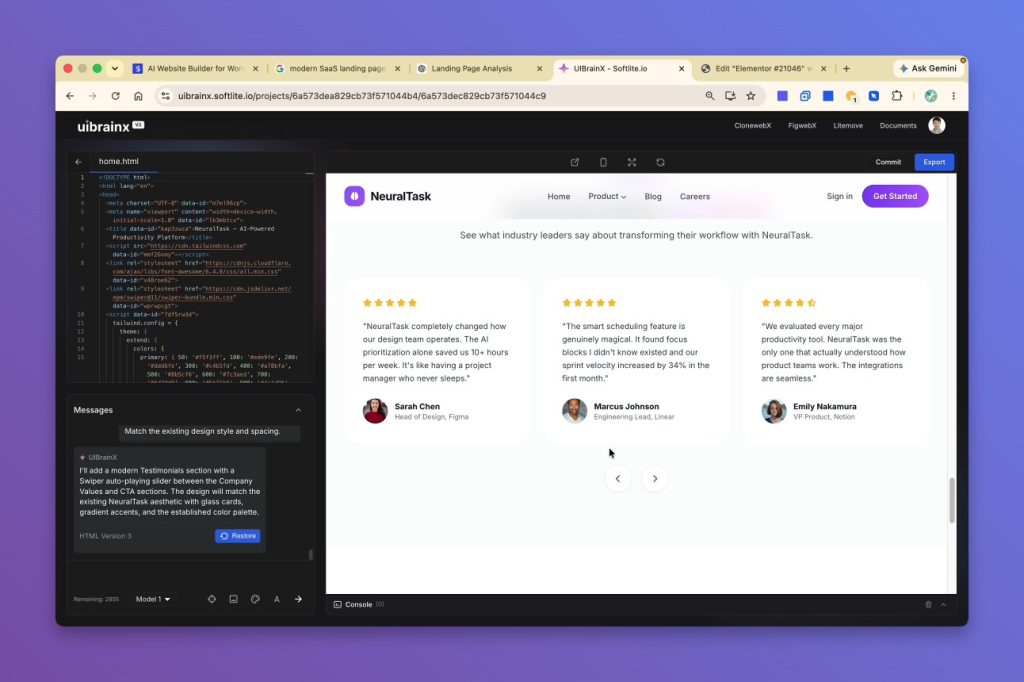
AI Generates Interactive Components
UIBrainX doesn’t simply create visual mockups.
It can also generate interactive website components that are ready for export.
This is one of the key differences between UIBrainX and ClonewebX.
While ClonewebX focuses on converting existing websites into editable projects, UIBrainX goes a step further by generating entirely new content and interactive sections using AI.
This enables you to expand an existing website without manually designing every new component.
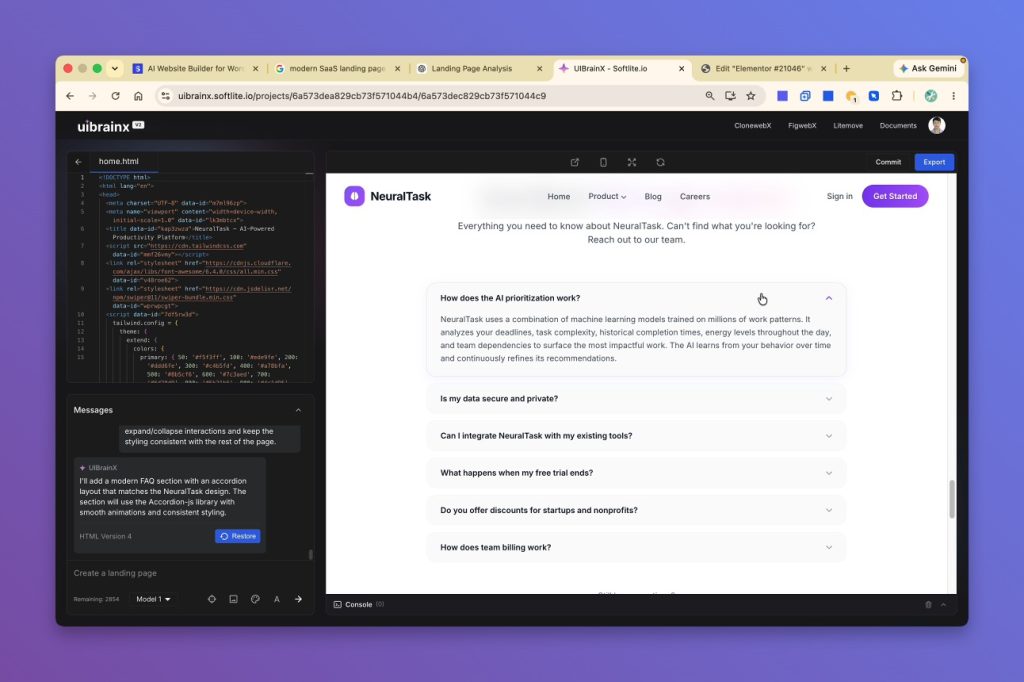
Example 2: Create an FAQ Accordion
Next, let’s add a Frequently Asked Questions section.
Instead of building each question and interaction manually, simply describe the desired layout.
For example, request an FAQ section with an accordion interface.
UIBrainX automatically generates:
- FAQ heading
- Question items
- Expandable accordion panels
- Consistent spacing
- Matching visual styling
The result integrates naturally with the existing landing page while maintaining a clean and professional appearance.
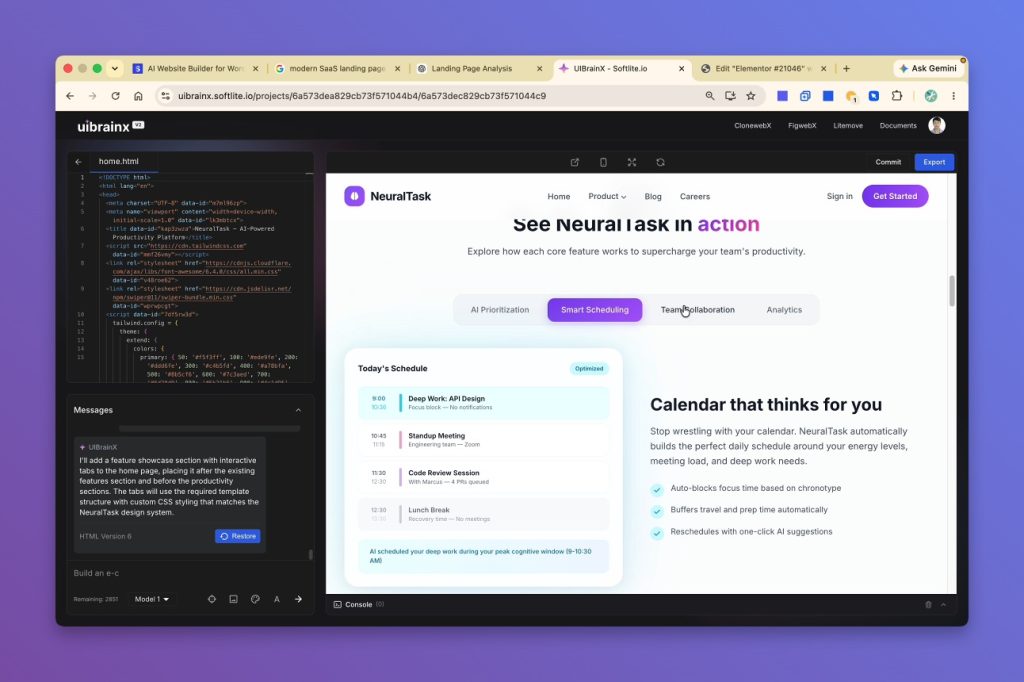
Example 3: Generate an Interactive Tabs Section
Interactive tabs are another common website component that can be generated entirely with AI.
Describe the section in natural language, and UIBrainX creates:
- Complete tab layout
- Multiple content panels
- Interactive tab switching
- Styling consistent with the rest of the website
Rather than producing a static design concept, the generated tabs are fully interactive and ready for export.
Build Dynamic Websites Faster
After only a few AI requests, the landing page now includes:
- Original AI-generated website
- Testimonial slider
- Accordion FAQ section
- Interactive tabs section
Each new section follows the same design language as the original layout, creating a cohesive user experience throughout the website.
Because these components are generated automatically, you avoid the repetitive work of building each section manually.
Save Hours of Manual Work
Creating the same landing page manually—including multiple interactive components—could easily require an entire day of development, or even several days for more complex projects.
With UIBrainX, the majority of that work is completed in just a few minutes.
In this tutorial, the complete workflow—including the original landing page and three additional interactive sections—used only four AI credits.
Instead of spending hours designing, styling, and configuring interactions, you can focus on refining the final result while UIBrainX handles the heavy lifting.
Ready for Export
Creating the same landing page manually—including multiple interactive components—could easily require an entire day of development, or even several days for more complex projects.
With UIBrainX, the majority of that work is completed in just a few minutes.
In this tutorial, the complete workflow—including the original landing page and three additional interactive sections—used only four AI credits.
Instead of spending hours designing, styling, and configuring interactions, you can focus on refining the final result while UIBrainX handles the heavy lifting.
Chapter 5 — Export Your UIBrainX Project
After refining your website, the final step is exporting your project into your preferred development environment.
Unlike many AI website builders that stop at generating a visual mockup, UIBrainX allows you to export fully editable projects to popular website builders, making it easy to continue development using the tools you already know.
Whether you’re building websites for clients or your own business, the export workflow is designed to fit seamlessly into your existing production process.
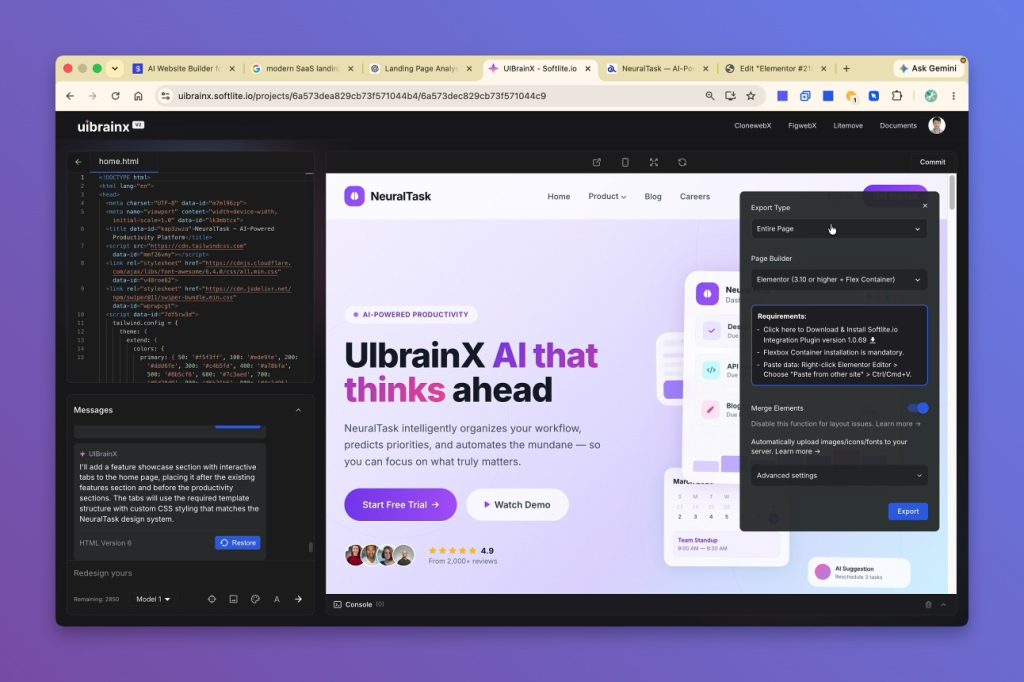
Open the Export Panel
To begin the export process, click the Export button located in the top-right corner of the UIBrainX editor.
The Export panel contains all of the settings required to generate an export package for your selected platform.
From here, you can customize how your project will be exported before downloading the final output.
Choose What to Export
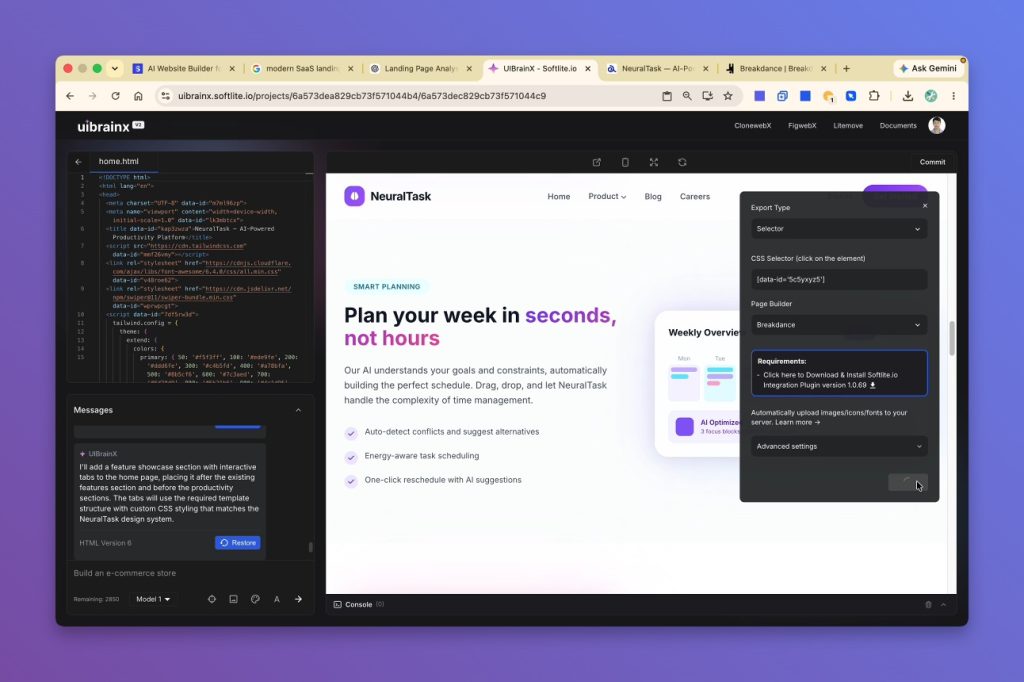
The first setting is Export Type.
UIBrainX gives you the flexibility to export either:
- The entire page
- A specific section
If you only need a single section, simply hover over the desired section on the canvas and select it for export.
This is especially useful when:
- Reusing components across multiple projects
- Updating existing websites
- Exporting only newly created sections
- Building reusable design libraries
For this tutorial, we’ll export the entire page.
Select Your Target Platform
Next, choose the platform you want to export to.
UIBrainX currently supports exporting to:
- Elementor
- Gutenberg
- Bricks
- Breakdance
- Divi 5
- Webflow
Because every export is tailored to the selected platform, you can continue editing your website using the builder you’re already comfortable with.
This eliminates the need to rebuild layouts manually after AI generation.
Export Your Project
Once you’ve selected:
- Export type
- Target platform
- Required platform settings
- Optional advanced settings
click Export to generate your project.
UIBrainX automatically prepares the export package according to the requirements of your chosen builder.
Because every platform uses its own export workflow, the generated output is optimized specifically for that environment.
A Builder-Specific Export Workflow
Although the Export panel follows the same overall process for every platform, the remaining steps differ depending on where you’re exporting.
Each supported builder has its own import workflow and recommended setup.
The following chapters demonstrate each platform individually, showing exactly how to import and continue editing your exported website.
Supported Export Platforms
UIBrainX currently supports exports to:
….
Chapter 6 — Export Your UIBrainX Project to Elementor
Elementor is one of the most popular export targets supported by UIBrainX. Once your AI-generated website is complete, you can export it as a fully editable Elementor template and continue customizing it using Elementor’s native visual editor.
This chapter walks through the complete Elementor export workflow, from preparing your WordPress site to importing the template, previewing interactive components, and understanding the Merge Elements feature.
Before You Export
Before exporting your project, make sure your WordPress website is properly configured.
Required Setup
Two requirements must be completed before importing UIBrainX layouts into Elementor:
- Install the Softlite Plugin on your WordPress website.
- Enable Elementor Flexbox Containers.
These settings are required to ensure the exported layouts import correctly and remain fully editable inside Elementor.
Step 1: Select Elementor as the Export Target
Inside UIBrainX, click the Export button and choose Elementor as your target page builder.
You’ll also see several export options, including:
- Export Type
- Merge Elements
- Advanced Settings
For most projects, the default configuration works well without additional changes.
Configure Advanced Export Settings
The Export panel also includes additional builder-specific settings.
Examples include:
- Mobile portrait settings
- Other Elementor-specific export configurations
In most cases, you can leave these settings at their default values unless your project requires custom behavior.
Step 2: Export the Project
Large landing pages contain significant amounts of layout data. To preserve the complete design, UIBrainX exports the project as a JSON template.
Once the export finishes, save the JSON file to your computer.
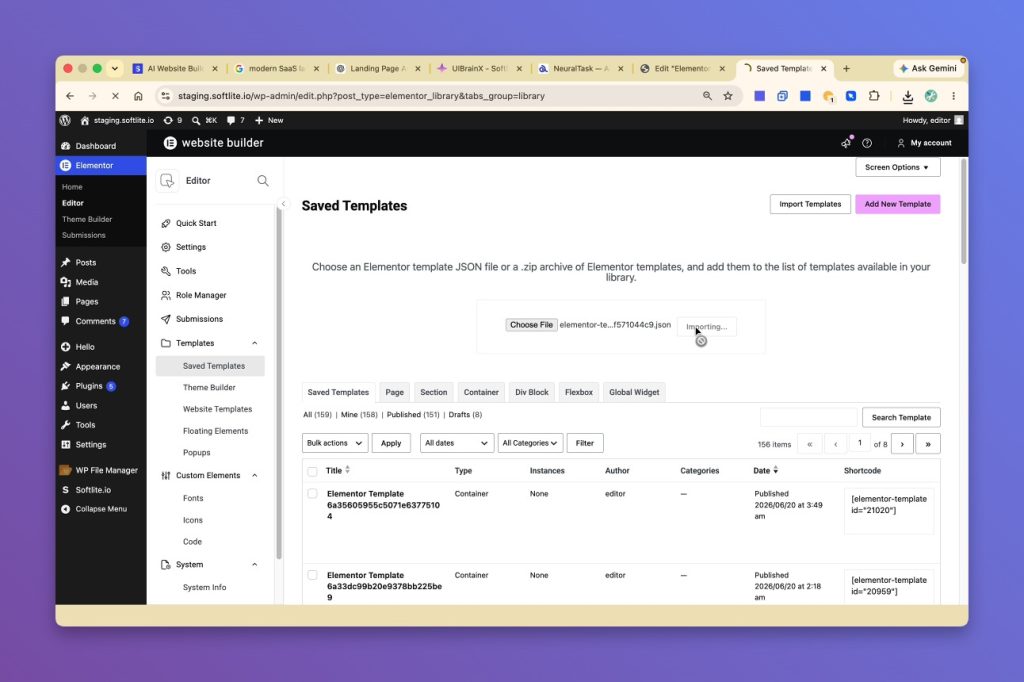
Step 3: Import the Template into Elementor
After downloading the exported template, switch to your WordPress dashboard.
Navigate to: Elementor → Saved Templates → Import Templates
Upload the exported JSON file.
Once the import completes, open the template with Elementor.
Fully Editable After Import
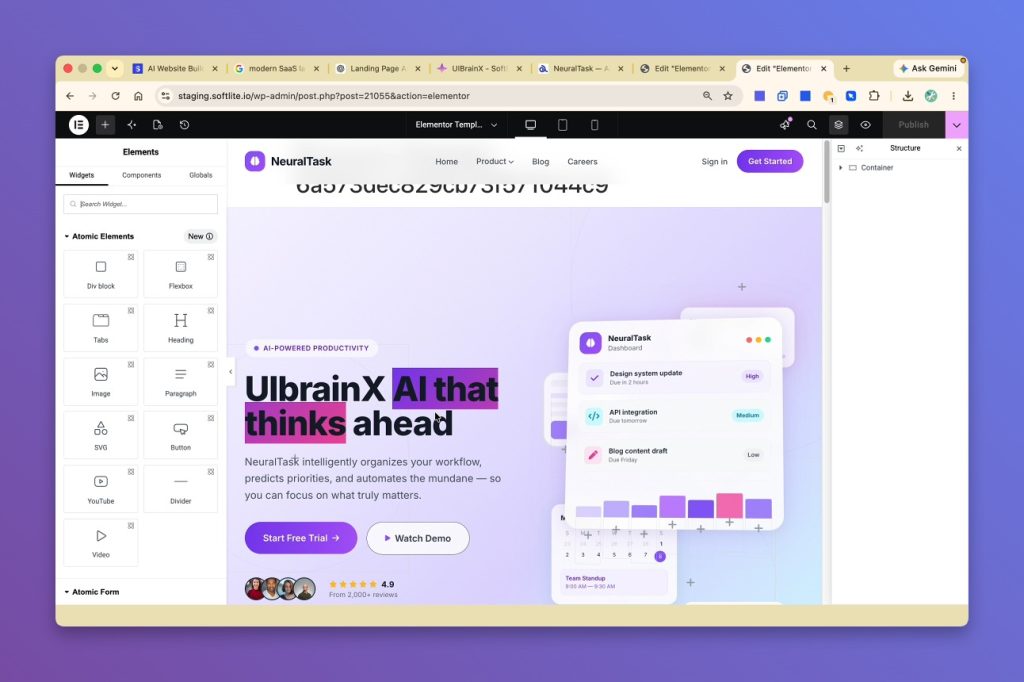
After opening the imported template, you’ll notice that the layout closely matches the original design created inside UIBrainX.
Every section remains fully editable using Elementor’s native tools. You can modify:
- Text content
- Images
- Typography
- Colors
- Spacing
- Layouts
- Widgets
Rather than importing a flattened design, UIBrainX creates an editable Elementor project that can continue evolving as part of your normal workflow.
Interactive Components Are Preserved
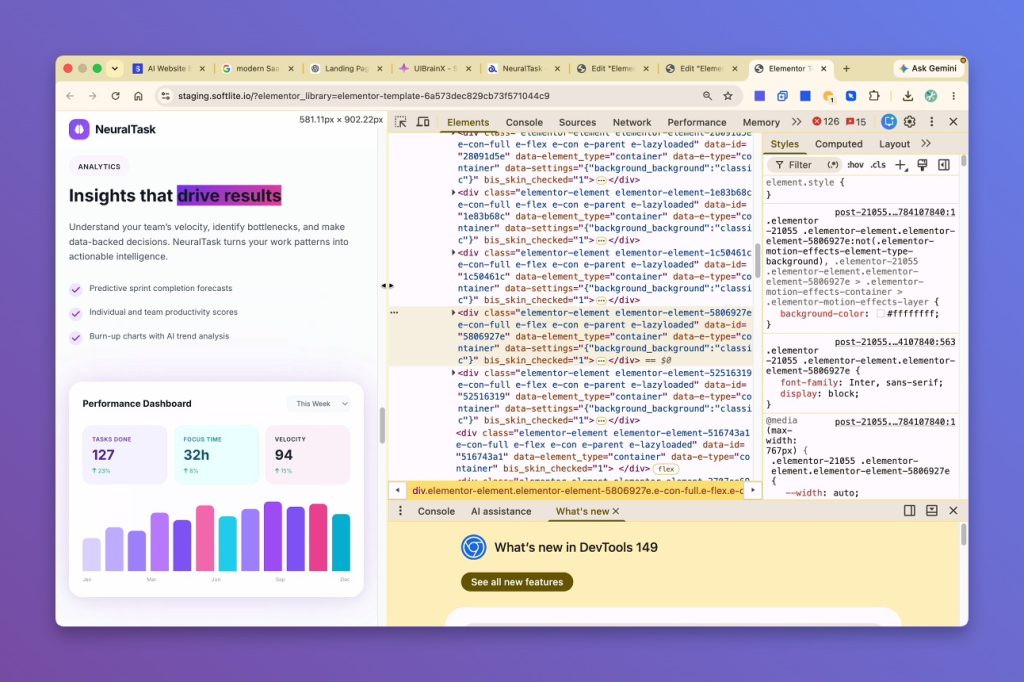
One of the biggest advantages of exporting from UIBrainX is that interactive components are included in the exported project.
In this example, the exported layout contains:
- Testimonial slider
- FAQ accordion
- Interactive tabs
These components are not static visual placeholders—they remain functional after import.
Responsive Layout After Export
After importing the template, review the responsive versions using Elementor’s built-in device previews. The generated layout automatically adapts across:
- Desktop
- Tablet
- Mobile
Spacing, typography, and page structure remain consistent across different screen sizes without requiring additional responsive adjustments.
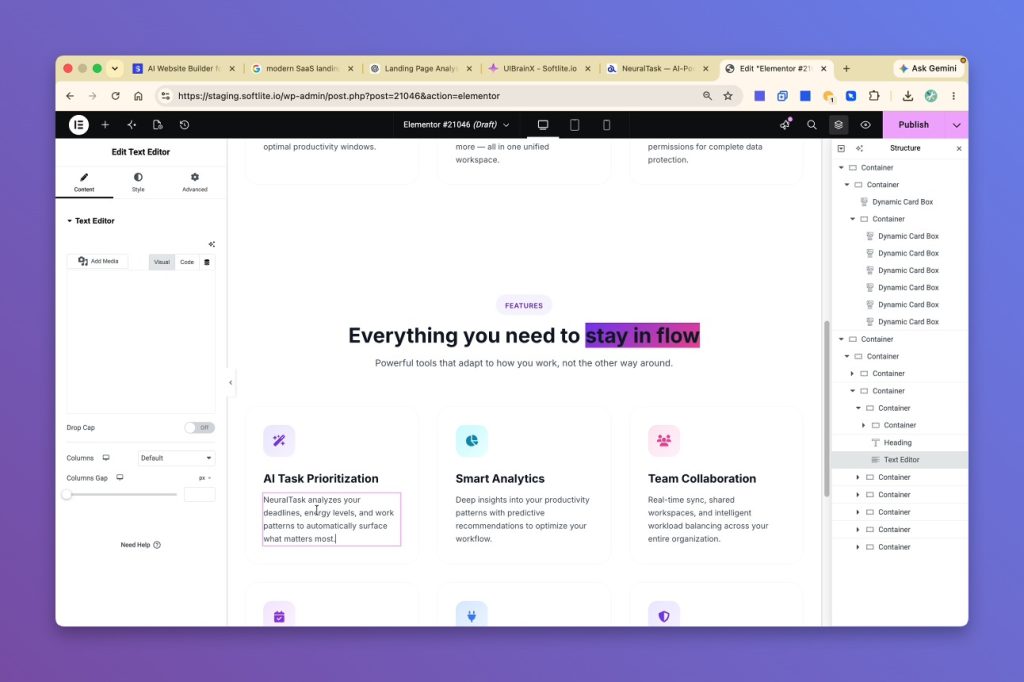
Understanding the Merge Elements Feature
One of UIBrainX’s most useful Elementor export options is Merge Elements.
This setting changes how content is organized inside Elementor while preserving the same visual appearance on the front end.
The best option depends on your preferred editing workflow.
Use Merge Elements when you want:
- Cleaner page hierarchy
- Reusable dynamic components
- Easier management of repeated layouts
- Less visual clutter inside Elementor
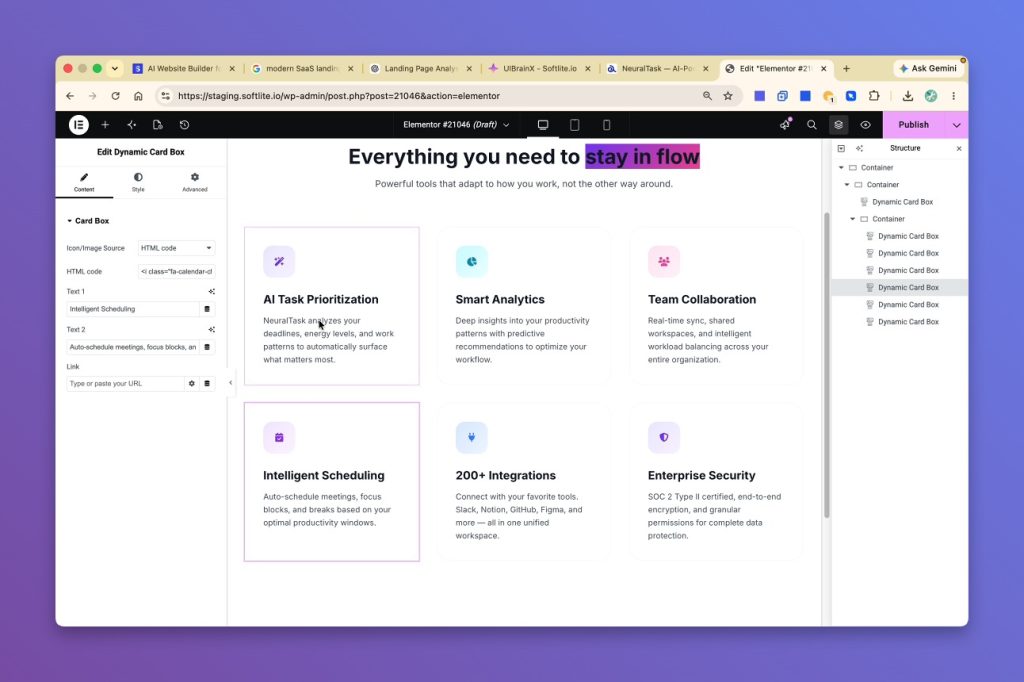
Disable Merge Elements when you want:
- Complete control over every widget
- Traditional Elementor editing
- Individual access to every content element
- Maximum layout flexibility
Regardless of which option you choose, the front-end appearance remains the same. The difference only affects how the content is organized inside the Elementor editor.
Chapter 7 — Export to Other Supported Builders
UIBrainX is an AI website builder designed to fit into a wide variety of website development workflows. In addition to Elementor, you can export AI-generated websites to several popular website builders while keeping the layouts fully editable.
Each export follows a familiar workflow: generate your website once with AI, choose your preferred platform, and continue editing using native builder tools.
The following sections provide an overview of how exporting works for each supported platform.
Export to Gutenberg
Gutenberg offers a simple and reusable workflow for importing UIBrainX-generated layouts into WordPress.
Export Workflow Inside UIBrainX:
- Select Gutenberg as the export target.
- Click Export.
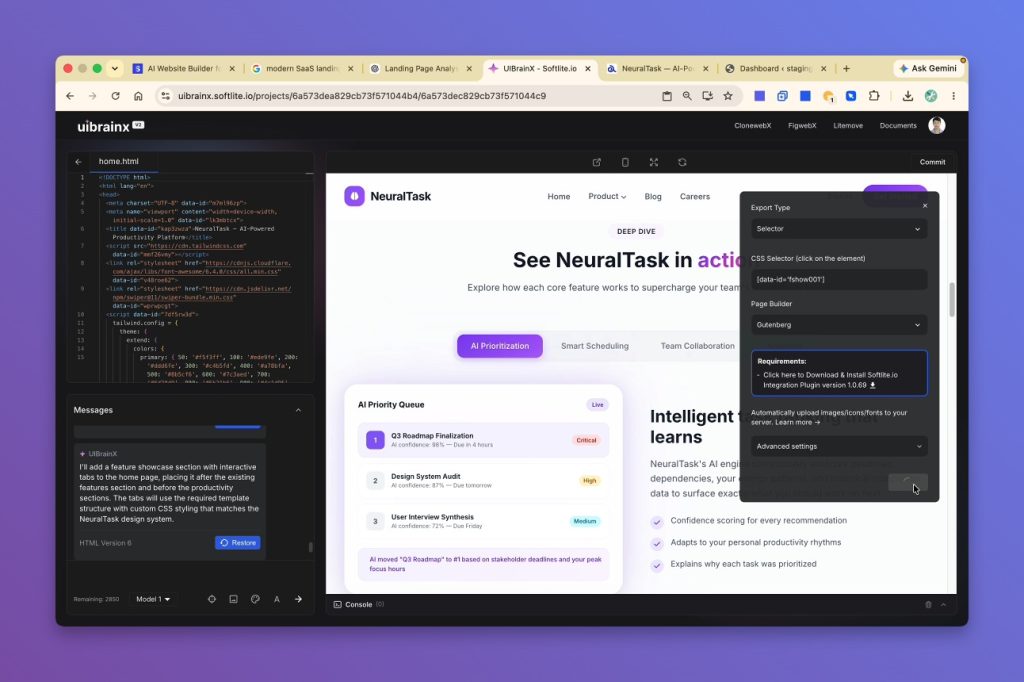
The generated layout is copied directly to your clipboard.
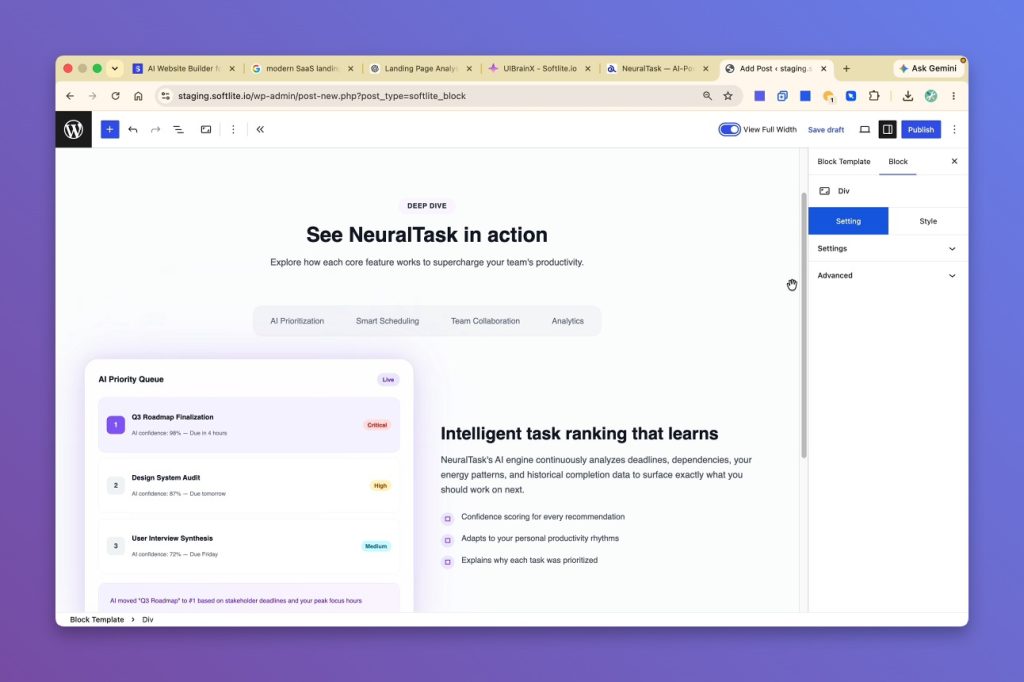
Next, switch to the WordPress Block Editor.
Add a Softlite Block, then paste the exported content into the block.
After publishing the page, a shortcode is automatically generated. This shortcode can be inserted anywhere on your website, allowing the layout to be reused across multiple pages while preserving the original design.
Export to Breakdance
Exporting to Breakdance follows a straightforward copy-and-paste workflow.
Export Workflow Inside UIBrainX:
- Choose Breakdance.
- Export the desired page or section.
Inside Breakdance:
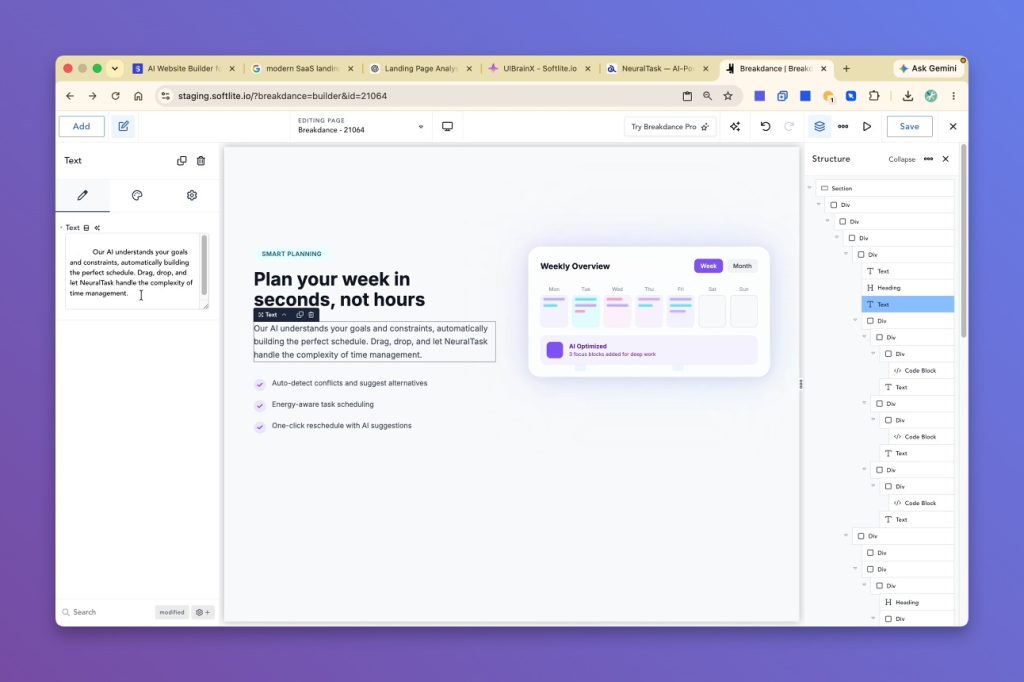
- Open your page.
- Paste the exported content.
The layout is recreated automatically using native Breakdance elements.
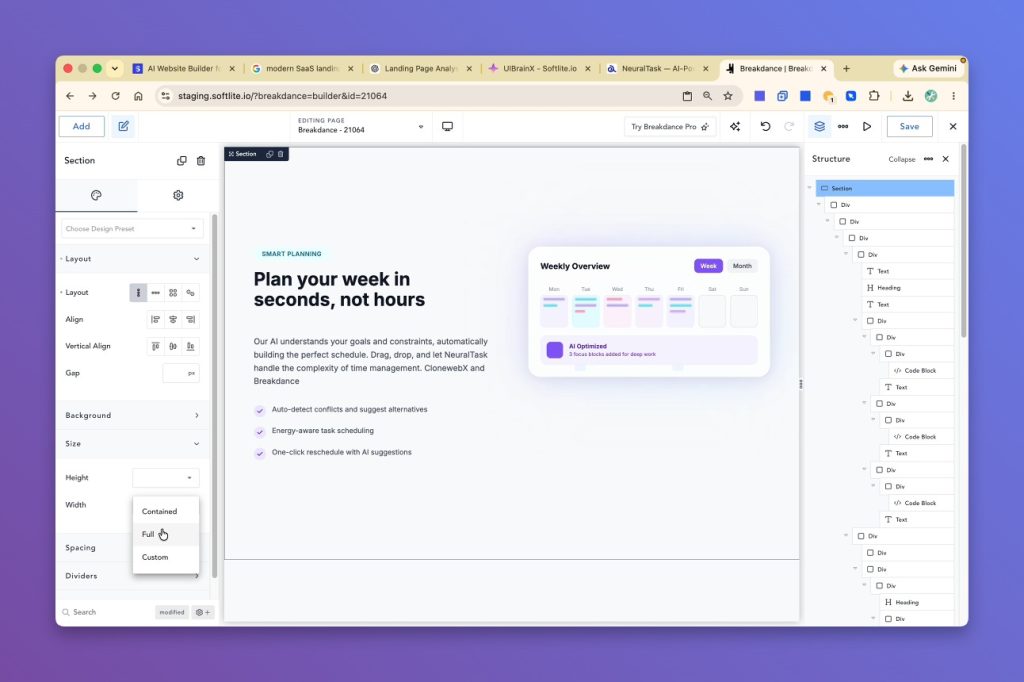
Depending on your page configuration, you may want to change the section width to Full Width so the imported design matches the original layout.
Once imported, every element remains editable using Breakdance’s native visual editor.
Export to Bricks
Bricks Builder uses a workflow very similar to Breakdance.
Export Workflow Inside UIBrainX:
- Select Bricks.
- Export the layout.
Inside Bricks:
Paste the exported content directly into the builder.
Within seconds, the section is rebuilt using native Bricks elements.
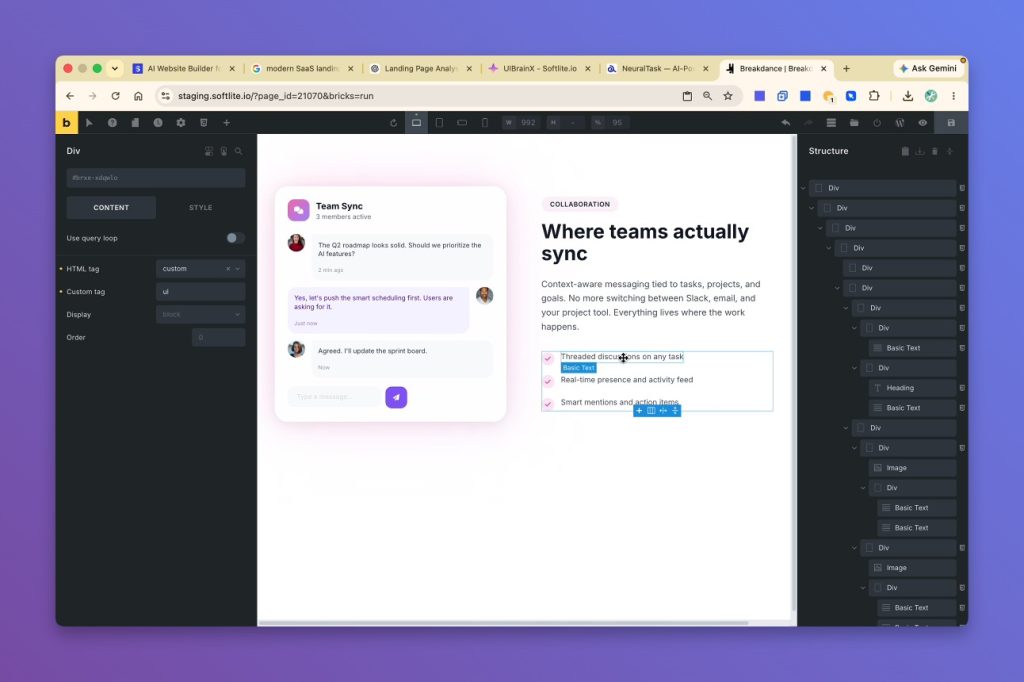
After import, you can continue editing:
- Text
- Typography
- Spacing
- Colors
- Layouts
Because the exported content uses Bricks’ native editing system, there’s no need to recreate the layout manually.
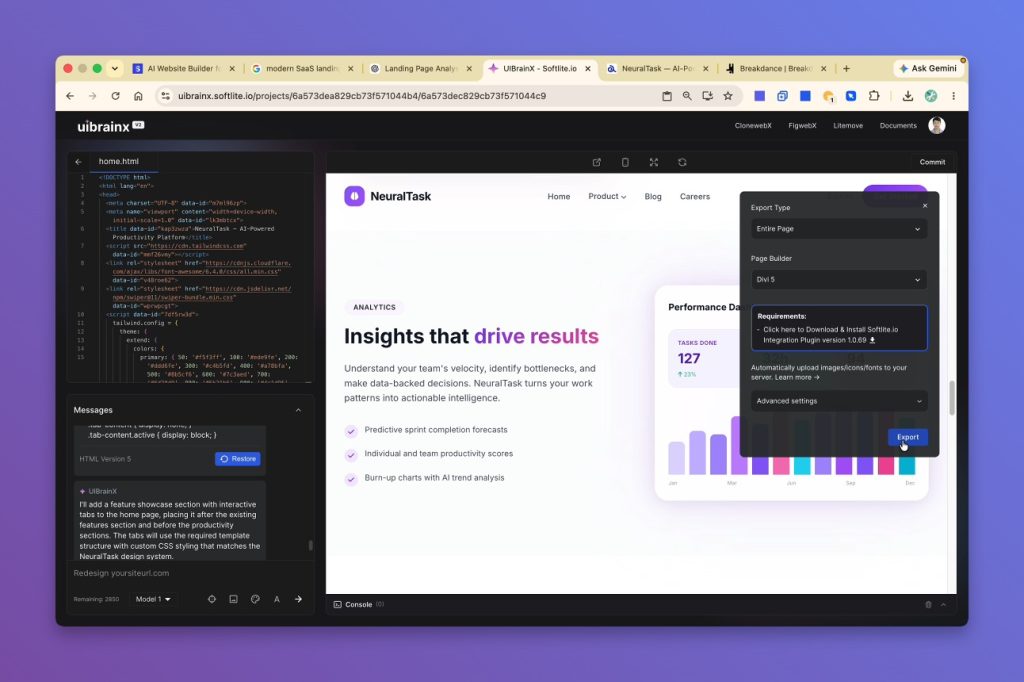
Export to Divi 5
UIBrainX also supports exporting projects to Divi 5.
UIBrainX generates a JSON template.
Export Workflow
Inside UIBrainX:
- Select Divi 5.
- Export the project.
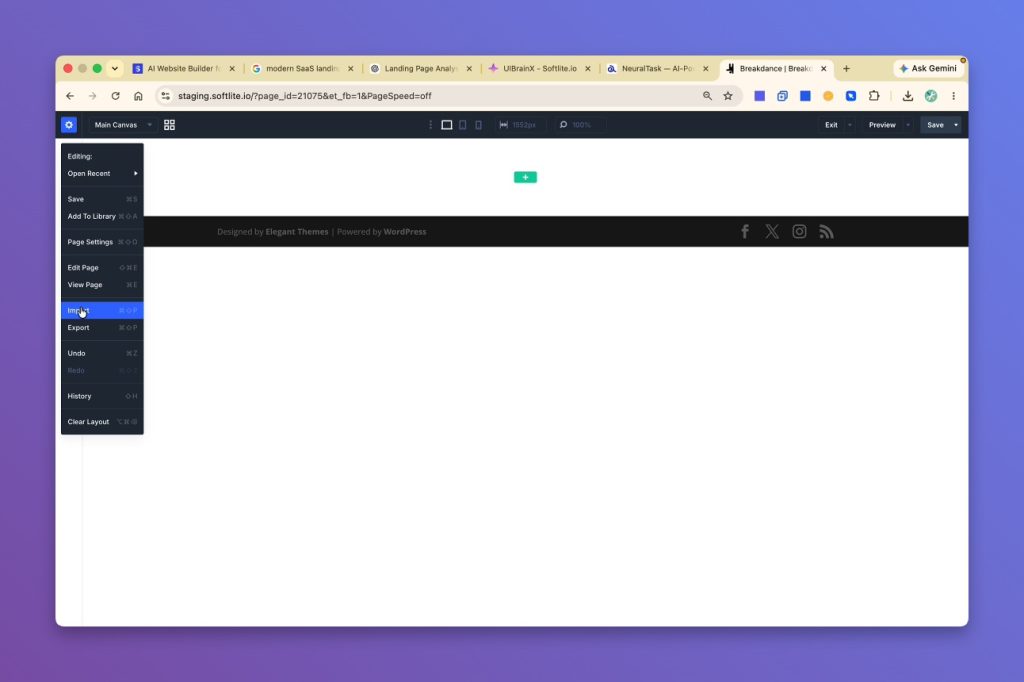
Inside Divi:
Import the exported JSON template.
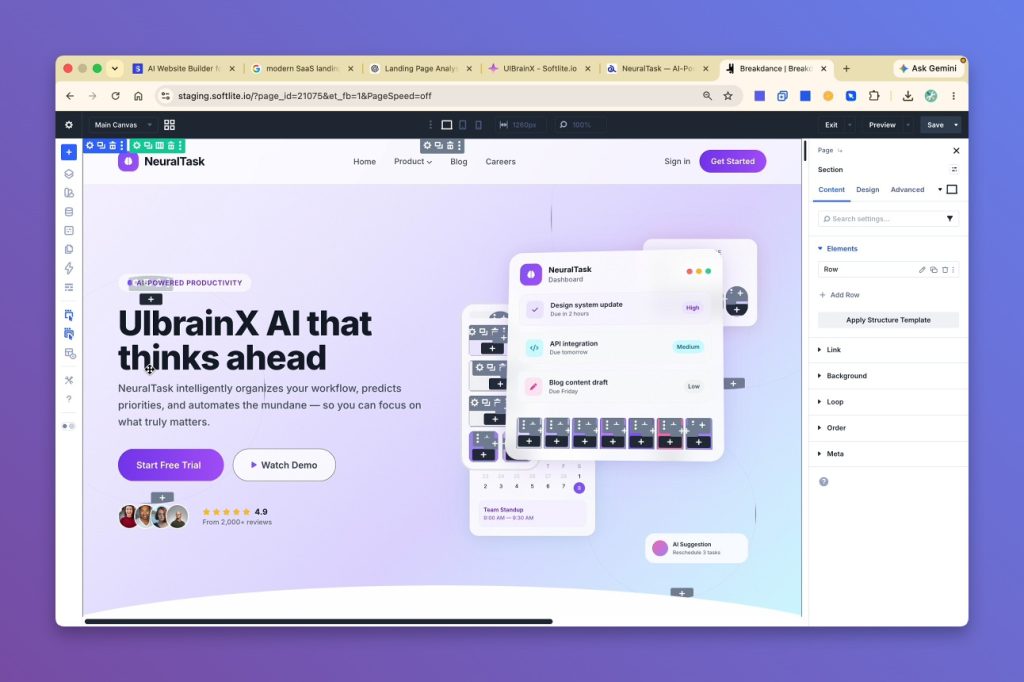
Open the page using the Visual Builder.
Once imported, every section, module, and layout is immediately available for editing using Divi’s native editing tools.
This makes it easy to continue building your website without recreating the design from scratch.
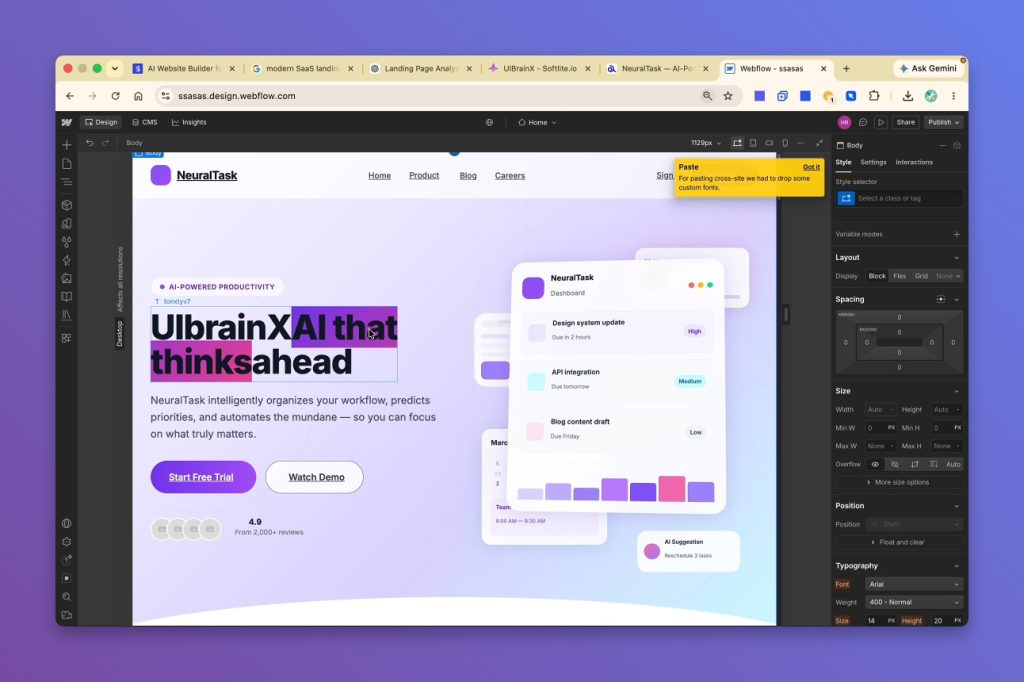
Export to Webflow
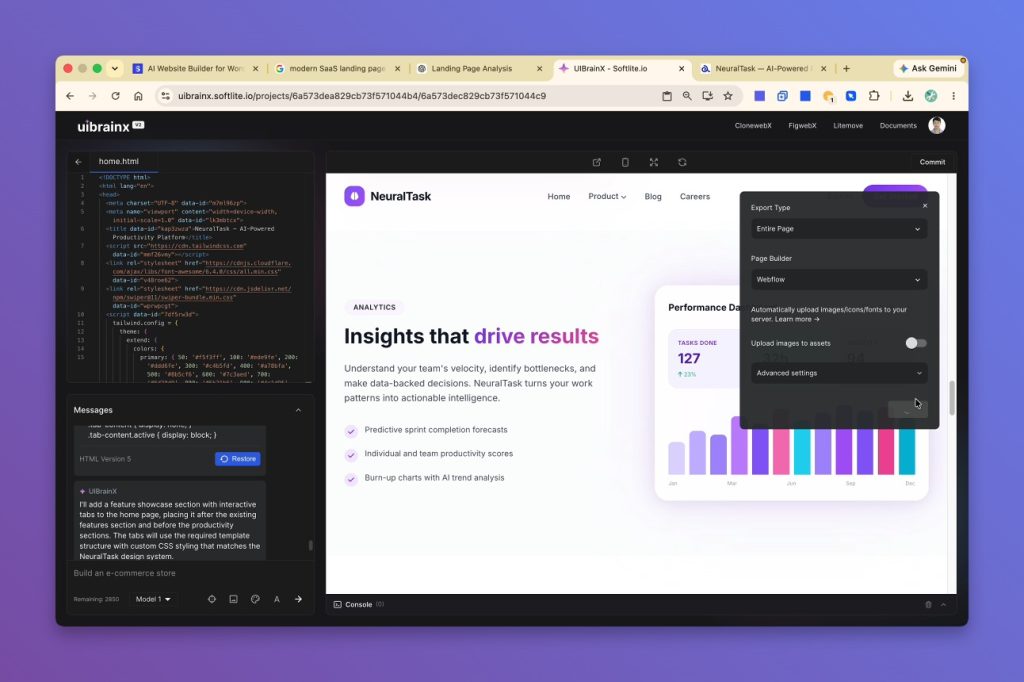
UIBrainX also supports exporting directly into Webflow.
Export Workflow
Inside UIBrainX:
- Choose Webflow.
- Click Export.
Inside Webflow Designer:
- Paste the exported layout.
After a few moments, the complete design appears inside Webflow with its overall structure preserved.
From there, you can continue customizing the project using Webflow’s native visual editing tools just like any other Webflow project.
A Consistent Export Experience
Although each builder has its own import workflow, the overall experience remains consistent across every supported platform.
The process is simple:
- Generate your website with AI website builder.
- Choose your preferred builder.
- Export the layout.
- Import or paste it into the builder.
- Continue editing using native tools.
This consistent workflow allows teams to adopt AI website design creation without changing their existing development process.
Build Once, Export Anywhere
One of UIBrainX’s biggest advantages is platform flexibility. Instead of committing to a single ecosystem, you can generate a website once and export it to the builder that best fits your project.
Supported platforms include:
- Elementor
- Gutenberg
- Breakdance
- Bricks
- Divi 5
- Webflow
Because each export produces editable projects rather than static mockups, you can continue customizing every aspect of the website after import.
This dramatically reduces the amount of manual work typically required to recreate modern, production-ready websites across multiple platforms.